Tag Archives: tank

Tankfest, 2018, part 4. The Tank Restoration Area

Well, this is one of the most interesting areas of the museum, and if my information is correct, it is normally closed for the public. Except on Tank Fest!

Lots of spare parts, lots of tanks and other vehicles in various states of direpair… things you can’t usually see: T14 Heavy Tank, Conway tank destroyer and many other vehicles I have only heard about.

The only problem was room: it was difficult to squeze through the tanks and take half-decent photos. The exhibit is also so very useful as a reference for scratches, faded paint, paint chips, oil stains, dust and rust.


Wargaming set up a World of Tanks event here: you were allowed to play thirty minutes on a press account, and you got a code for a Churchill III, a T-shirt, and a backpack. (Not very sturdy ones, but still.)

I managed to try the FV4005 (presently grinding for it), and the Defender -to see how OP it is. In my hand it was not very… Unfortunaltely I had no time to try the rare, or never released tanks also in the garage of the account.

Oh well.


Keep an eye out -more photos are incoming.

Tankfest, 2018, part 3. Tigers and Panthers


3imcmlw


The Tiger exhibit. Lots of Tigers…

Tiger 131


Ferdinand


Tiger II (Henschel turret)


And finally, the Panther (which is in another part of the exhibition)


Tried to take photos of scratches, oil leakage and damage. (Obviously they are museum exhibits, but they still can come useful.)


Keep an eye out -more photos are incoming.

Tankfest, 2018, part 2. -the cutaway tanks

A cool exhibition of a Centurion cut in half, along with a somewhat corny video of a tank maneuvering and shooting on the range.

A cutaway T-55… this is something I’m definitely going to do. I mean I did try to do one before, but I always held back of fear of ruining the model. Not any more… The new MiniArt T-55A Mod 1981, here I come. (I really like the idea of cutting away the side of the hull by the driver.) There are other examples, too, for inspiration.

Assorted thanks sitting around. Black Prince, Comet, Archer, Panzer IV, The Penis Tank, and the rest. A WoT wet dream.

An armored plate with some projectiles sticking out…


Keep an eye out -more photos are incoming.

Tankfest, 2018, part 1.

Ever since I’ve learned about it, I wanted to see a Tankfest. Back when I was still sitting in Florida it seemed very unlikely that I’d ever get to one; but even though I did live in the UK for more than 8 years somehow I still managed not to go even once. (To be fair, Bovington is not exactly public transport friendly, and I did not have a car for most of the time.)

2dtd1s

This year, by accident, I actually got to see Tankfest. I guess I am Good Luck Brian now.

Since we were leaving the UK for a job on the Continent, we decided to spend a couple of days around Bournemouth. It is an incredibly nice place, especially when it is summer (and I do not mean the usual British summer. I mean the 30 degrees, baking hot summer), and I wanted to see the Museum on the side -who knows when I would be able to come back to visit, right? (My poor wife was very accommodating and did not object spending a day among these metal contraptions.)

I planned to get to Bovingdon on Tuesday but we decided the last minute to do the Tank Museum on Friday. I had some vague memories of Tankfest being around the end of June, but with the trans-Continental move and all I did not exactly pay attention. Friday morning comes the shock- Tankfest. And I do not have tickets…

The 40 minute drive to the Museum was a bit intense for my taste; I just wanted to see some tanks, and was worried that I would not be able to get in due to the event.

Well, I was in luck – even though both Saturday and Sunday was sold out, Friday was still available. It was not a “proper” day yet, more of a trial run for the big day. No famous youtubers, no wargaming events, and no pyrotechnics for the tank show.

The place was not very crowded, on the other hand, so you got to get close to the tanks, and could enjoy the show without other people pushing and getting in the way, which was definitely nice. I overheard someone who worked there remarking that it was so much better than the usual overcrowded events. I also saw the end of the day a big group of people shepherded around  -and recognized Quickybaby in the crowd. I guess this was the Youtuber section being introduced to the Museum. The Chieftain was also there; I wanted to say hi to him, but a certain Youtuber cut in the queue, and stepped in front of me. (I was a queue of one.) Shame on you, mate. And you call yourself British. (No, it was not QB.)

I got some freebies from Wargaming for playing the game on site (a T shirt, a small backpack and a code for a Churchill tank), and I got to enjoy the tank show in the arena. To be honest the whole event was much smaller than I thought it would be. The tanks were really noisy; I never thought the tracks can be this loud.

I also got to crawl around the tanks in the museum. And this is where I saw something that was both hearbreaking and funny in equal measure. (I know I’m going to hell.)

A small kid was just standing by the cut-in-half Centurion, completely still. His face was set in the grimace of complete despair and abandonment, and the tears were just streaming on his face. Apparently he was left there by his family. A Tank Museum volunteer was talking to him, while calling others on the CB, so there were about ten people swarming around him, trying to console him, while he was just standing there, staring in the distance, still in shock, not reacting to anything, and only responding to questions in a very subdued, muted voice.

I may go to hell for finding this whole situation both sad and funny, but the father of this child will definitely be there waiting for me. SHAME ON YOU, MISTER. YOU ARE A BAD PARENT.

I mean I get it, I like tanks, too, but seriously? You forgot about your own kid?

Interesting photos of the Sd.Kfz 251: the armor looks really rough. I always assumed that it was smooth; after all, none of the photos I’ve seen suggested this level of roughness, not to mention the models have not featured it, either. (Cast/rolled armor texture is something that is shown in modern kits.) Its counterpart inside the museum featured smooth armor. This may -or may not- be a Czech-made vehicle, retrofitted to look like a German Sd.Kfz. 251. (Someone suggested it might be the leftover texture after the rust removal process.)


I really liked these abandoned, weathered tanks- the two big Cold War Warriors, the Centurion and the T-55. Good reference photos for extreme weathering.

Matilda I – you have to love it if for nothing else but for the eyes. Cool little tank.

Assortment of tanks standing around.

Churchill turrets shot up on the range… good reference for damage and rust.

Cold War tanks in profile.

American heavy -M103.


Russian heavy- the IS-3. Astonishingly small… the same size as the Type 59 and the T-72 standing next to it. I also took a sneaky photo of the interior as seen from the driver’s hatch. The only interior photo I’ve ever seen of the IS-3.

Type-59… the legendary WoT premium vehicle; otherwise a Chinese copy of the T-54.

ip5h9kl

T-72… now this is a tank I’d like to get into. I would love to see the autoloader in person.

And we’re inside… (It was HOT outside.) Starting with the KV-1. It’s surprisingly large… I’d love to see it next to a Tiger.

Modelcollect T-80UE part 2.

Well, the painting phase arrived finally. (To be honest I always have several models stuck in this phase because it takes time to set up the paintbooth. This is the bottleneck of my model building process.)

There was also an accident involving this tank. Do you remember I talked about the necessity of gluing the turret in place in the first part? Well, it was not glued in at this point -and I successfully knocked off all the PE shields from the front of the turret on one side. My most valued and cherished wife found three of them; I replaced the fourth with a part I fashioned from aluminium foil. (I can’t tell how much I appreciate my better half, by the way. She tolerates my hobby without a complaint, and even helps me finding parts that flew off into the big empty.)

Once the disaster was averted, I sprayed dark grey Vallejo primer on the model. I gave a day for the primer to dry, and then sprayed Tamiya Buff. I looked at several photos and this color looks very close to the actual vehicle’s basecoat. The green patches were sprayed on free-hand. The green was lightened considerably with the base color. I was contemplating using masks, but the model is full of tiny protruding details -something all masks love to pull off in my experience. I used a relatively low pressure, and kept the gun close to the model; I found the process pretty easy to control, and simple to do. There was minimal overspray; the demarcation lines between the colors came out pretty good.

The last step was to paint the black lines and patches by hand. I used a dark grey color rather than pitch black to account for the scale effect.

As usual, a couple of layers of ochre filters helped to blend the colors together, and I sprayed Future on the model to provide base for the decals.

There is also a very extensive decal sheet provided; the painting guide only offers one option with minimal decals, so it’s probably a comprehensive sheet that Modelcollect uses with all their Russian armor. (Will be useful for my W-Models Pantsir build.)

Once the decals dried, I sealed them with Future, and applied a dark pin wash to the model. After about a day of drying I used a wet brush to remove the excess, forming good-looking streaks in the process. Wherever I felt there was too much wash left on the surface of the model I used a flat dry brush to remove it.

I gave a week for the wash to dry, and sprayed a flat coat over the model. I’m always a bit anxious at this step as this is where you see what the model will look like; the flat varnish makes the colors lighten a bit. I painted the tracks and the rubber rims of the roadwheels with a fine brush- again I used very dark greys instead of black. Using a 00 brush I painted discreet chips on the tank: the side-skirts got heavier black chips (since they are made of rubber). I also used the base color on the green parts for light damage, and Vallejo’s German Black Brown for deeper chips. I tried not to go overboard; in this scale no chips would be visible, but they do give some visual interest to the model. I also used sponge chipping on the barrel and larger surfaces – again, trying my best not to overdo the effect. I added some rust washes on the larger areas where chipping was more prominent; once dried I adjusted the effect with a wet brush.

I applied dust-colored pigments to the lower parts of the hull a very diluted dust mix on the top part; again I readjusted everything once dry. The exhaust got a tiny bit of black; I tried not to go overboard.

As a final step I rubbed a silver pen on the tracks and the edges of the model to simulate the shine of worn metal as usual.

Overall the model is excellent; I can wholeheartedly recommend to anyone.

Modelcollect T-80UE

x207
In the last couple of years Modelcollect quickly gained a reputation for producing good quality models of Cold War Soviet vehicles -and “1946 Alternate History” type of German panzers. (E-75, weird walking tanks, hypothetical AAA tanks based on the E-100 chassis, the P-1000 Ratte in 1/72 (!), etc.)

I always liked how busy modern(ised) Soviet armor looks; since they are quite small, the exterior is really busy with all the equipment could not be fit inside, and the constant modifications, extra armor and sensor equipment also add to the unique look.

This is my third Modelcollect build; and the first one that does not depict a somewhat esoteric vehicle (meaning: it actually exists).
The build was an easy and quick one. Since there are several versions of the T-80 offered, the model is full of extra parts; I was very happy to see an armored shield for the commander’s hatch included, which I will add to an older T-72 build.

The only issue with the turret is that it’s quite loose in the turret ring; this combined with the heavy metal barrel means you’d better off gluing it into place because it will rotate quite violently when the model is moved. The rubber protector flaps for the turret ring are made of PE, which is very nice: you can fold them a bit to make them look more realistic. (They are best installed after you fixed the turret in place; there is very little clearance between the hull and the edges of these flaps, so you can knock them off easily if you move the turret.)

The lower hull went together fine, since the fit is very good, and the running gear is actually easy to assemble. I chose to add everything -tracks, return rollers, idlers and drive wheels- before painting. This means I will have to be careful to paint the rubber rims and the tracks with a brush, but it also simplifies the assembly. The tracks are very good – the pieces fit together like a dream.

The two mudguards are pretty elaborate pieces of plastic; most of the detail is moulded-on. It’s not readily apparent that the rubber side-skirts are, in fact, made of rubber. They looks like massive armored slabs. The 1/72 Revell T-72 has very well done side-skirts in this respect; and to be fair to Modelcollect, even newer 1/35 scale tank models have these side-skirts moulded straight as if they were made of metal plates.

The PE engine grilles are excellent, and really improve the look of the model; and the PE lamp guards are also pretty impressive. (And, more importantly, easy to assemble.)

The holding brackets for the external fuel tanks are somewhat flimsy (it’s difficult to determine what goes where), but using a little patience and checking a few reference photos it’s not hard to install them correctly. The un-ditching log has a very nice wooden texture.

And that’s it – the building was a breeze. (I was watching documentaries with my wife while building the tank; it took me two evenings altogether- about four hours total.) Right now I’m contemplating the best way to go about painting it, but since it looks really impressive with all that shiny brass, I decided to leave it like this for a while.

Flyhawk 1/72 M1A2 SEP tank

3

The M1A2 SEP (System Enhancement Package) is an updated version of the Abrams featuring depleted uranium reinforced armor, updated ballistic computers, fire control and other systems. This is an upgrade package that can be applied to any M1 variants: several older M1A1 were updated to the M1A2 SEP levels. (A good summary of the vehicle can be found here.

I was quite interested in Flyhawk’s M1A2 SEP model; all their kits I’ve built so far looked like miniaturised 1/35th scale models with regards to detail (and sometimes complexity), so there’s quite a reputation to uphold.

(In short: they do.)

The packing of the model is exceptional: all the sprues placed in the same bag are fixed together with a thin rubber band; and the delicate parts for the turret baskets are wrapped in packing foam to prevent damage.

The PE fret has a circular mask for the wheels; it is a really welcome feature.

The plastic is exceptional quality, all the ejection pin marks are in inconspicuous places, and the sprue gates are very small. There is virtually no flash to clean up. The detail is simply speaking incredible – the best example is the subtle but very realistic anti-slip surface on the turret and hull, or the single-piece gun barrel. The machine guns are pretty amazing, too: the barrels are hollowed out, and the ammunition belt running from the ammunition box is modelled, too. (Something 1/35 scale kits sometimes do not have.)

The instructions are provided in a booklet for the tank, and as a fold-out page for the mine plough. Interestingly the assembly of the mine plough has as many steps as the tank itself (although it’s obviously less complex.) The booklet is very well designed; the English is not very good, but understandable. (Being someone whose English is not perfect either, I should not be throwing stones, though.) The instructions make very good use of colors to help with the assembly process, and also provide several views of the more difficult steps to aid the modeller. Flyhawk also provided tips and some useful pieces of advice, which is very much welcome. The instructions, and the fact that the whole model was designed to be as user friendly as possible, makes for a very pleasant building experience. (The design is excellent: it is very difficult to mistakenly attach something upside down or on the wrong side – even the gun barrel is moulded in a way that it only fits into the mantlet in one way.)

As far as I could determine the model is accurate. The size is spot-on for 1/72, but I’m not really familiar with the M1- people who are better acquainted with the type are more qualified to judge the accuracy of the model.

The lower hull is assembled from four parts: a bottom, two sides and the back. This is somewhat of an old-school approach, but the fit is good, so there is no problem here. The hull already has the swing arms for the road wheels attached; this makes the build simpler, but you won’t be able to position them to conform to an uneven terrain, should you wish to build a diorama. This is going to be made more difficult because of the unique track assembly: the tracks come finished; they are assembled from two halves, but these join longitudinally. It’s very welcome due to the simplicity of assembly, but it limits the modellers options. The running gear assembly is actually quite innovative: you attach the inner row of road wheels to the hull, add the inner halves of the tracks, and then glue the outer set (and the drive wheel) on, and finally add the outer halves of the tracks. Even though the instructions suggest you glue the side-skirts on before you even add the top of the hull to the bottom, they are probably going to be the last things to be installed – well after the painting stage is done. They are provided as single pieces; you cannot open them up. The fit to the hull is OK, but not perfect, though.

The hull has a lot of PE grilles provided, which is great; there are some very fiddly PE parts, though. (The PE casting numbers on the turret are a bit over the top in my opinion. I could just about to manage the cables running to the headlights.) In general, there are a lot of tiny parts -both plastic and PE.

The turret is a pretty straightforward assembly. The hatches can be positioned open should you wish so -although there is no interior provided. The loader’s hatch has a bit too many parts I feel – Flyhawk does have the tendency of giving multi-part sub-assemblies that would shame a 1/35 model. Unfortunately the instructions only detail how to assemble the hatch in a closed position.

The vision blocks need to be tinted (reddish), as the instructions advise. It’s probably a good idea to paint the back of their slots black before inserting the transparent pieces. You get some PE welding numbers for the turret, but seriously? I took a look at them and after a brief, amused chuckle I just left them untouched; I feel these numbers should have been moulded onto the turret. I appreciate the fact that they are individual for each and every turret, but here there was a decision to be made: either satisfy the purists (I think the term “rivet counter” has acquired somewhat of a negative overtones lately), or make the build reasonably simple. I think a generic casting number would have been sufficient; if anyone was unhappy with it, they could have just sand it off, and use the PE alternative. Unfortunately Flyhawk did not mould numbers on the turret sides, and so instead of incorrect detail I ended up with none.

The other, somewhat challenging part to build was the racks/baskets on the back of the turret. These multi-part plastic/PE contraptions were not easy to build at all; some patience will be necessary.

The mine plough is somewhat of a fiddly assembly (OK, it’s an understatement: it is a VERY fiddly assembly). In fact this is probably the weakest point of this model. The instructions are not very clear in some crucial steps; it is hard to decipher what goes where. A drawing of the finished sub-assemblies would have helped out tremendously. The tiny parts are difficult to handle without launching them onto the carpet. The other issue is that the attachment point of the dozer blades is quite flimsy, and you can easily break them off during handling.

Flyhawk provides a very fine piece of chain that you will have to cut into five parts to be attached to the plough. Once you are finished the results are pretty impressive: the plough has movable skids, and the locking arms on the frame can be disengaged, too. I’m not entirely sure of the advantages of a non-static mine-plough. I guess the plough could be made to conform a terrain feature in a diorama, or shown being installed, but I’m not certain this option is worth the effort that comes with building it. I would have preferred to have something simpler to assemble – or have better instructions. Either of these would have been nice.

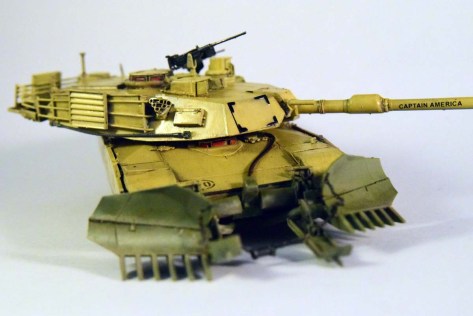
The overall building was done in three quick sessions -this is not a very difficult or long build. The mine-plough was the most time consuming part of the build the truth be told. The painting steps took a tad bit longer. I’ve applied a German grey primer to the whole of the model, followed up by the desert brown in several thin layers to keep the shading effect of the dark primer. I’ve decided to go with the brown desert scheme with the plough painted green- I really liked the contrast of the two on the box art. (I originally wanted to build it in three-tone NATO colors.) Even though it’s not authentic, I kept the “Captain America” decal from the three-tone option, simply because I liked it better. My model, my rules I guess. I gave a try to the PE mask provided for the wheels, since the outer wheels were not attached to the model yet. (In retrospect I should have just left the inner row off as well; I painted their rubber rims by hand.)

Once the basic colors were on, I installed the tracks and the outer row of roadwheels, installed the skirts, and went on to weathering the model. The lower part of the hull received some light pigment dusting. I added some filters to modify the tones somewhat, and sprayed Future over the model to prepare it for the decals. Once the decals were dried, another layer of Future sealed them on, and provided a good basis for the upcoming wash. I used the wash to create some streaks as well in several layers; I also used a couple of AK Interactive streaking products, too, to give some subtle variation in color. The front ID panels have black corners; since there are no decals provided, and I did not trust my hands with a brush I used a permanent marker to paint them.

After it dried I sprayed a matte coat over the tank. That’s about it – the model was finished.

Overall I have to say the build was a pleasant one, although the sheer number of tiny plastic parts (especially in the plough assembly) was sometimes a testing my patience. The results are spectacular for sure. I’ve built Revell’s M1A2 a couple of years ago, and I have to say it’s difficult to decide between the two kits. (Long-long time ago I’ve built the old 1/35 Trumpeter Abrams. This 1/72 gem easily trumps it -bad pun intended- when it comes to detail.)

The Revell kit has excellent detail for the scale, but Flyhawk easily surprasses it in this regard. You do feel like you have a premium quality model in your hands when you build it. On the other hand the Revell M1A2 is a much simpler build. It boils down to preferences I think: if you don’t want to be bothered with tiny parts and PE, the Revell is a good alternative; if you want to go all-out, there’s the Flyhawk model for you.

Going deep down- the world of 1/144 armor

fu85sob

This is an interesting part of the armor model world: the 1/144 kits by DLM. They are small little gems; it’s a shame that they disappeared from the market. If you have a chance, grab as many as you can. The presentation, the level of detail, the ease of assembly are all just top-notch; these kits provide a nice break from the 1000+ part 1/35 monsters I sometimes get involved with. For this scale you still get moulded-on detail that rivals some 1/72 kits, and also PE, and slide moulded gun barrels with holes in the muzzle breaks. Thankfully you don’t get individual tracklinks.


I’ve built several of these kits in the past: a Leopold railroad gun, a
15 CM S.I.G 33/2 (SF) Auf Jagdpanzer 38(T) Hetzer, two Tiger Is, and a Jagdpanzer IV. I’ve also built Takom’s P1000 Ratte, and the two Maus tanks that came with it. Since the Maus was not featured here before, and it finally resurfaced from the storage box it’s been languishing until now, I thought I’ll give it some time in the spotlight.

All the display boxes were bought from Ebay; they are brilliant for small 1/72 or an average 1/144 armor model.

And since I was taking photos of older builds, I took some more of the Tiger Is; hopefully the macro lens brings out their details a bit better.

Milicast Bergepanther Ausf A (final production) 1/76 review

headerI’ve known about Milicast since, well, forever. (Or at least as far as 2005.) I remember finding their website, and looking at the wide selection of interesting models thinking I’d never be able to afford the prices and the shipping to the US.

Well, this has changed; I moved to the UK, and I do have a slightly better salary (which is balanced by living in London…). Anyhow, I’ve ordered the Bergepanther as something I always wanted to try from them. (They even have an M3 Lee with interior. In 1/76.)


I’ve written about the model and the issues I encountered during the assembly in my review on Armorama; if you’re interested, I’d refer you to there. Here let’s concentrate on the assembly and the photos…

The complete hull is given as one, hollow part. It has all the running gear, tracks already attached; the middle is empty, where the interior (driver’s compartment, winch assembly) needs to be placed from under. There was a considerable gap left between the sides of the hull and the interior insert. Also, another issue was that the bottom of this part needed to be trimmed so that it did not stick out from under the vehicle.

The basic assembly is actually quite easy and fast. I went around the building and painting steps in an unorthodox sequence: first assembled, painted and weathered the hull, then added the interior.

Most of the winch assembly is a single piece, with some impressive detail; it’s a shame most of it is hidden once the tank is completed.

I added most of the larger details to the hull (with some of the more fragile ones left out), and did the painting and weathering. The tank was primed with red-oxide, sealed with dullcote, and applied a chipping medium by AK Interactive. I used Mig Ammo’s Dunkelgelb, and did a moderate amount of chipping using a stiff, wet brush. Since engineering vehicles undergo some serious strain, and they also tend to last longer than front line tanks, I was not worried about overdoing the effect. (This is a constant dilemma of mine; real tanks are not as rusty and worn as we depict them; absolute realism, however would make quite boring paintjobs.)

Once I was satisfied with the level of wear-and-tear, I sealed the paint, and followed with several brown filters. I also used Vallejo’s oil stain weathering product on the engine deck, and several light brown pigments on the sides and top to depict dust. The lower part of the hull and the running gear received a generous amount of mud (prepared from pigments mixed with turpentine) in several layers and colors; the last step was to rub some metallic pigments onto the tip of the dozer blade/spade. Since this is an engineering vehicle I wanted to make it properly dirty and oily. (The small scale makes it easy to overdo, though.)

Only after all the weathering was done did I glue the interior in, and chipped the bottom away a bit with a scalpel so that it did not stick out from under the tank. (It was quite thick, and could be easily seen if viewed from the front or back.)

I think completing the hull before installing the interior and small, fragile parts worked out overall, but I did run into some difficulties of my own making. It was also a bit more tedious to add the exhaust ports after the dozer blade/spade was installed, for example, and I already mentioned the gap issues, so plan ahead with the build. It would probably be easier to glue the insert in, fill the gaps, paint, and then start weathering of the interior, followed by the painting and weathering of the hull.

Once most everything was finished, I continued with the raised frame and wooden planks around the winch assembly. Since most of the engineering vehicles were converted from broken down Panthers, I used primer red on the metal parts- this particular Bergepanther was not given an overall paint coat after assembly. To decrease the stark contrast between the red of the metal and the rest of the tank I’ve used Tamiya’s Model Master set (the one that looks like a makeup set) to add different dust and sand colored pigments; this is a quick and easy way to do weathering. The wooden sidewalls were painted Tamiya deck tan, and I used burned umber oil washes to make it look like wood- the texture is really nicely done. There are wooden planks covering the interior provided as well. I did not use them, as I wanted to display the winch; you may cut it up into separate planks, and just scatter them around the vehicle. There is also an optional armor plate/raincover (?) for the crew compartment but I also left it off.

One word of warning: when installing the frame around the winch, make sure that the side with the hole is facing backwards; this is where the cable from the winch goes through.

I have done most of the detail painting and weathering steps at this stage, leaving the fragile parts off until the last moment. The MG-34, the 2cm autocannon and the crane was added on the very last step.

The crane went together easier than I expected. I was prepared to display it folded up, and call it a day, to be honest. I was pleasantly surprised how easy the assembly was. The only bit I’m not satisfied with -which is my fault- is the slight angle the top chain has in the middle -obviously it should be ramrod-straight. If there is a small weight on the hook, the tension straightens it out, so I might actually find something to hang on it to make it look a bit more realistic. I assembled the crane in situ (in place), but it might be a better way to assemble vertical parts (two rods and the connecting chain forming a triangle) separately, laying flat on a surface first. There is a similar problem with the section of chain with the hook at the end: the resin hook is not heavy enough to pull the chain down. (I have a Revell Famo engine in my spares box; I’m thinking about installing it to deal with both of these issues.)

As the very last step I glued the wooden beam to the side of the tank (which I have forgotten about to be absolutely honest until I reviewed the photos).

Overall the kit was not as difficult to build as I thought it would be after looking at the instructions. It is a pretty good representation of the Bergepanther, and you can customize it to resemble several different variants easily. The scale is somewhat archaic (not many new 1/76 kits are being made as 1/72 has seem to have won the competition), and the model itself is quite old-school in its design, but this does not mean it’s not a good one. Anyone enjoying Braille scale resin kits will like this model.

1/35 MiniArt T-54-1 build review p.1

Well, the long awaited MiniArt T-54-1 is here finally. I’m in the middle of several builds -somehow I ended up reviewing and building a lot of kits at the same time. Nevertheless this model got priority when it arrived, since it was something I really had an interest in.
I planned to build the Tamiya kit in my stash with the CMK interior set parallel, but until I can finish up the ones already started, I do not want to begin to work on new builds. Too bad, I guess. (I did start on the Tamiya last night, since I finished two out of three OKB kits, and the all Luchs as well -some left to be published at a later date.)


Later installments:

Part 2

Part 3

Part 4

I would not start an essay on the tank itself; I’ll put it into my review to be sent to Armorama. I’ve used the references available on the T-54, T-55 research group on Facebook; I would like to thank everyone there for putting together such a comprehensive resource.

Short version of the review: the model looks really, really good. (I’m not trying to be a fanboy; it’s honestly a great kit.)

A slightly longer version:

Opening the box we are faced with a bewildering number of small sprues. MiniArt, as usual, followed its philosophy of modular kit design, which does help creating multiple versions of the same vehicle easily, however it does present a problem finding the sprues you need during building. Add to this the tendency of having to use several sprues during sub-assemblies, searching for sprues was a constant activity during the build. If you have the space it’s probably best to have them out and labelled visibly.

Fortunately there are only few of the notoriously thin plastic parts that are impossible to be cut off the sprue without breaking. One of the handholds for the turret was already broken in my sample, but I normally replace them with wire anyhow. It’s much easier than trying to clean up these extremely fragile and thin plastic parts.

The placement of the gates are sometimes a bit unfortunate: instead of having to clean off one edge, they sometime overhang, and this necessitate cleaning (cutting or sanding) two or three surfaces. This is especially notable in the case of the individual track links, where you will need to clean multiple sprue attachments from three faces (bottom, top, side) on all the track links… (I really, really like magic tracks, to be honest; they come pre-cut, ready to assemble. I have to confess: the assembly of tracks and the painting for ammunition are the two least favorite parts of model building for me, so anything that makes my job easier is welcome.)

The plastic is nice quality; soft enough and easy to work with. The detail is astonishing. From the texture of the turret to the casting numbers on the suspension units, everything just looks like a miniaturized version of the real thing. The torsion bar suspension is working, but I’m not sure how useful it is since the tracks will need to be glued together to make sure they are held in place. (The different panzer III variants by MiniArt had a workable track solution; it would have been nice to have this utilized on the T-54-1 as well.)

The interior followed the usual T-44 layout – that is to say it’s still closer to the T-44 than to the T-54 final version. The driver’s compartment sadly lacks a lot of instruments and whatnot… not that it’s going to be visible, but still. At least it’s there, unlike in the T-44 kits, so you have something to work with should you wish to improve the area. I have decided to use the rain cover for the driver’s hatch, which is something I’ve never seen before.

The turret interior, on the other hand, is really well done; most everything is in place.

I’ve left the engine unassembled for now- I’ve built a couple of these from the SU-122, SU-85, T-44, so I’ve decided to leave it out for now. I might finish it later and display it in front of the tank as I’ve done with the other kits. (There are differences between the V-34, V-44, V-54 engines, but they are not apparent immediately.)

The interior was painted and weathered the same way as I did with the T-44. In short: a dark brown basecoat with hairspray applied was oversprayed with Tamiya white for the sides and a grey-blue color for the bottom of the hull. A stiff brush and some water helped to create some moderate chipping I applied a light brown filter to make it more dirty and used. I’ve only added the smaller parts after I did the basic weathering; with the turret it might have been a mistake. (There are a lot of smaller bits that are white, and they might stand out if you paint and weather them separately. Time will tell.)

I tried to keep weathering restrained; after all the amount of chipping and rusting was normally minimal while the vehicles were operational. Maintenance does take care of these things normally.

The ammunition was painted using Vallejo’s new acrylic gold paint; the results are pretty good. I did not bother painting the tips for the ones that were placed into the rack. I’ve used photos for reference found in this website for painting.

The mudguards were finished separately before attaching them to the hull. One thing to keep in mind: do the PE straps first, and then add the toolboxes. I glued the boxes in first… In some cases the boxes were in the way, and it made attaching the straps difficult.

The AA machine gun is a pretty complex assembly, but the detail is really great. Cleaning up the sprue attachment points on the barrel is not easy, but possible. (There are aftermarket barrels available, but it would be a shame to throw the plastic out; it is very well detailed.)

The engine deck features some of those notoriously thin and fragile plastic rods MiniArt loves to include with their kits. I did not even attempt to cut them off the sprue; it was easier to fabricate similar parts from wire, and use those. (Added benefit: you cannot glue them accidentally to the plastic mounts, since the plastic glue does not work on metal.

The smoke canisters, as I said, were moulded as one piece, and the PE/plastic contraption that holds them in place are kind of fiddly to assemble. (The mechanism that allows ejecting them is modelled in great detail… sometimes I feel less is more.)

The model is certainly complex, and it’s easy to burn out; especially if you work on a review. What I did was to pace myself: once the larger assemblies (turret interior, mudguards, hull interior) was done, I just kept coming back to the model to add the smaller details a few at a time. I did the machine gun one night, “dressed up” the engine deck the next- it’s easier to make progress one step at a time.