
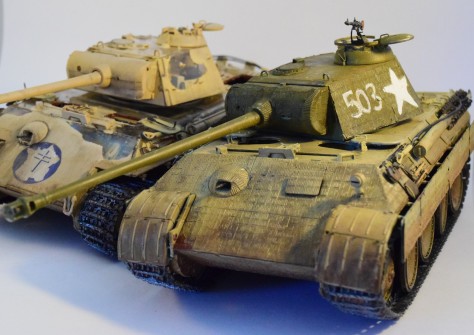
So I finally finished these kits.


It is worth watching this little youtube video just to get into the mood:
There is also an interesting summary of wartime analyses by the Allies.
The builds can be found here: RFM and Takom Panthers. I also did an an in-box comparison with lots of photos of the parts.
If you are interested in more sprue shots and individual in-box reviews, both have been covered by other modellers; the Takom model was reviewed here, and the Rye Field Model here.
Problems with the kits:
Let’s start with the problems because I am a Hungarian, therefore naturally predisposed towards pessimism and negativity. I would also mention here that some of the problems listed are absolutely a matter of taste… so do not be surprised if you see two opposing features (too much detail vs not enough detail) listed. I am trying to give an impression of both kits, and both have their positive and negative aspects.

RFM
I think the first two are really serious; the rest is more a matter of personal taste.
- Fit issues in the bottom hull. Serious fit issues
- Fit issues with the top of the hull… not as serious but still. There are some gaps left at the sides, and there are no side-skirts that would hide them.
- Extremely overenginered (way too many parts for details that are mostly invisible)
- A LOT of PE. As they say: just because you can do something, it does not mean you always should do that thing. Some detail could have been moulded on, or provided as a plastic part. Some are not even visible.
- Individual tracks are provided pre-detached only attached to a small piece of plastic, so cutting is simple, the teeth are moulded hollow, which is great, but there are two injector pin mark on each track link, which, frankly, sucks.
- The gun breech is a two-part affair, with the two parts joining right in the middle. Somewhat annoying to fill. As with the Takom muzzle break -why? It is not the ’70s any more.
- The horizontal hull sides are attached using large “flaps” which will leave some serious and visible seamlines to clean up. A bit sloppy.
- The tube running around the gun breach (compressed air bore evacuation system) is missing. It can be replicated using wire, but with a kit this complex you really should not have to. I would expect at least four, near invisible PE and an extremely thin plastic part for it.
- fume evacuator hose from the turret basket is a rigid, two-part assembly, difficult to install
- apart from the gun breech, some parts are designed so that they are joined smack in the middle, so putty is needed (a part of the turret turning mechanism, for example).
- you have to add some rivets to the parts instead of them being molded onto them… (same part as above)
- options are not always explained clearly
- some of the injection pin marks are in visible places; technology makes it possible to do away with them, so the modeller does not have to fill and sand
- the working suspension breaks/bends very easy. I know the torsion bars are made of plastic, but I still ended up gluing them in place, before the whole tank started to sit funny.

Takom
- Less detailed than the RFM kit (I know, I know, contradicting the RFM list). The turret interior is especially visibly less detailed.
- two part muzzle break -not a big deal, but… why? It looks like a very archaic solution
- static running gear (some like it, some do not)
- the teeth on the tracks are a chore to attach and not always stay on; no injector pin marks, though.
- Static suspension
- some of the pictures in the instruction manual are really tiny
- some of the injection pin marks are in visible places; technology makes it possible to do away with them, so the modeller does not have to fill and sand
Good things about the kits
RFM
- extremely detailed; a museum quality model can be built out of it. It is ideal for wrecks, cutaways, vehicles under assembly or maintenance
- working suspension and tracks. The assembly of tracks using the little jig is a joy
- the clear parts make displaying the interior simpler
Takom
- easy to assemble (well, relatively); it reminded me of the MiniArt kits I have been building, with a little better quality
- elegantly designed
- tries to do most everything without the use of PE; some people may appreciate it (I do), some may not -it is a matter of taste.
- Link and legth tracks – assembly and installation using the provided jig is a joy. (Again, it is a matter of taste; both types of tracks have positive and negative aspects.)
- the fume evacuator hose from the turret basket is a flexible part, which is amazingly simple to install
Further advice
RFM
Just one: follow the instructions religiously. As with the Takom kit (and most kits) I deviated from them, and it really bit me in the bum.
Bonus advice: it is a marathon. Do not rush it.
Extra bonus advice: you get more ammo than you will use. Do not paint them all… just paint as many as you need.
Takom
Number one: follow the building sequence. It sucks because it will make painting of the interior more difficult, but if you do not, you will have to look out for the following especially:
- Do NOT attach the hull sides before installing the transmission. The transmission needs to go in first.
- Also: do NOT install the torsion bars before the transmission.
- Do not attach the torsion bars to the sides as the instructions show (you are supposed to slide them in place when attaching the side) . I found it really frustrating to do so since the side does bend a bit, and it makes sliding the torsion bars into place really tedious. I think inserting the torsion bars before adding the sides would simplify this issue tremendously.
- I messed up a bit with adding all the details onto the hull bottom; they covered the attachment points for some of the torsion bars, making installation a bit more difficult than necessary. Just follow the order of the build in the instructions.
- Do not attach anything to the interior of the sides before painting. It makes masking a nightmare. (But you will have to paint the smaller parts with hairy sticks…)
- Do add the batteries before installing the drive shaft and the firewall. Do not ask me how I found out the order.
- The commander’s cupola is easier to assemble if you first glue K2 and K24 together (top of the cupola + insert), then add the periscopes, and finish off with K3. It is really difficult to fit the periscopes in if you follow the instructions. The periscopes, by the way, are not clear, so they will need to be painted for lens effect. (RFM provides clear parts for the periscopes.)
- you get more ammo than you will use. Do not paint them all… just paint as many as you need.
Conclusions
I have to say both kits have positives and negatives. The sheer amount of detail really makes the RFM Panther stand out, there is no question about it. It is absolutely up to the modeller if she or he is willing to put up with the problems of the kit: the overengineering and the fit issues. It is a very ambicious, a very impressive, but a little bit flawed model nevertheless (fit-wise). Many times I did feel like the model was actively fighting me, but now I am ready, I actually feel like giving it another shot, this time to build a really messed-up wreck.
Compared to the RFM Panther the Takom kit builds up like an “ordinary” model; it does what it says on the box, and builds into a respectable model of the Panther. You have to weight the pros and cons and make your decision. I could not, so I built both; I do not regret it. Both kits are excellent -but you have to make your own decision which one to get.

3 thoughts on “The tale of two Panthers 2: a build comparison of the Rye Field Models and Takom models”