Tag Archives: windex chipping

1/72 AMX-40 by OKB Grigorov

l7eiuen

This is one of those tanks that definitely has a lot of personality. From absolute obscurity it was launched into the general consciousness* by the online game World of Tanks, which features it as a tier IV light tank. It has a certain notoriety as it is certainly one of the worst tanks in the game, but despite of this it became somewhat of a legend (or a cult, rather) simply due to its quite unique looks. It’s a sort of hipster tank, just like the Churchill Gun Carrier. The WoT community has created several amusing memes around it, and it has its own nickname: “The Duck”. Right now the only mod I run with the game is the “rubber duck” custom paintjob. (See below)

*Well, more accurately, into the general consciousness of a certain gaming community…

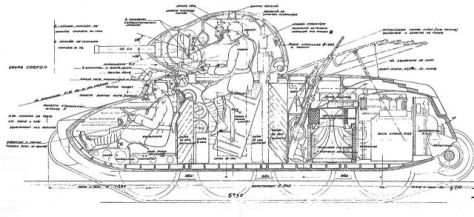
The unique look of the tank is the result of its designers taking the idea of sloped armour to its limits. The plans were drawn up in 1940 as a replacement option for the S35 and S40 cavalry tanks, but due to the German invasion these plans did not materialise; no prototypes were ever built. (To be fair it would have probably performed just as bad in real life against panzer IIIs and IVs as it does in-game.) The only contemporary image of this strange-looking tank available online is a drawing. The tank did inspire a lot of online creativity, thought…

gdq57kx

I have been toying around with Blender trying to make a printable model of this tank, but so far my efforts are less than satisfactory. (I’m not giving up, though; if I succeed I will paint it in the Rubber Duck scheme.) Needless to say when I saw that OKB is producing a version of this vehicle I ordered one at once. I quite like this feedback of computer games into the scale model industry; a lot of newer releases (KV-4, AT2, etc.) were clearly inspired by the weirder prototypes, paper panzers popularized by WoT.

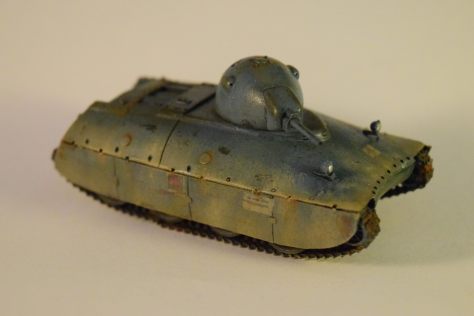
The kit comes in a typical OKB box, the parts placed into ziplock bags. The instructions are computer generated and quite simple, but this is a simple model after all. Once you finish the suspension/running gear (I have no idea if they are accurate), you’re essentially finished. It comes with two PE parts, and two transparent resin pieces for the headlights. It lacks the back-mounted machine gun that was planned (that up-pointing gun mounted behind the turret). Other than that it looks very similar to the blueprint, but distinctly different from its in-game representation. (Which is a shame, because the WoT turret with its secondary machine gun turret looks much better in my opinion. It’s absolutely fictional, but looks trump historical accuracy. Well, this is what Blender is for, I guess.)

The model went together without a hitch. The suspension arms fit well, the wheels went on nicely, and the tracks were a breeze to install; that was pretty much the extent of the build, really. Apart from this I had to glue the turret and the gun in place, install the headlights, and add the side-skirts. The building process took about an hour. The only tricky part was to fix the side-skirts onto the curved profile of the tank.

The painting was also pretty easy: I primed the model with the side-skirts off with Vallejo’s German Grey primer, and applied AK’s Chipping Fluid. Once dry, I mixed up the (fictional) blue-gray color from WoT using Tamiya paints, and misted it over the model in several layers. This was followed by some moderate chipping using a wet, stiff brush.

When the model was dry, I used some oil-paint based filters (light brown, blue) to modulate the base color somewhat, and sealed everything with gloss varnish.

Unfortunately there are no decals provided with the model.

After weeks of consideration I decided to test out printing waterslide decals using an inkjet printer. The results were not satisfactory (I used transparent decal paper instead of white, and the colors are very faint), but life is about learning, right? If you want to have faded markings, print decals -that’s my conclusion. The other -bigger problem- is the thickness of the decals; they are just not going onto the surface very well, you can see silvering despite of soaking the whole model in decal softeners, and in general, just being crappy decals. Conclusion? Buy an aftermarket set next time…

The headlights were painted using a chrome pen.

I added the decals, sealed them, and painted on some more scratches and chips. Using Tamiya’s makeup set I added some dust on the lower part of the chassis; and this concludes the painting and weathering phase; the Duck is ready.

Overall the model is nice: well designed, easy to assemble, and unique-looking. The price is moderately high, but affordable; it’s great as a weekend project (or for the true fans of Le’Duck).

1/35 Meng Renault FT-17 part 1.

I’m finishing up long outstanding builds… so I have several of these builds running parallel. I’m finishing up the T-55 (and quite a few others) alongside of this build.

bv8ppon

This is probably the most iconic tank -ever. (Or it should be.) Meng has come out with a really excellent model of it a couple of years ago, and this February I just gave in and purchased one at my local hobby shop.

I was not disappointed. The manual is excellent (and gives a pretty good history of the model), the instructions are clear, the quality is top-notch. AND it comes with an interior. I have to say I fell in love with Meng.


The assembly is quite straightforward, with a couple of issues, though. (What model is without them, right?)

The suspension actually works; you get little metal springs with the model, which is nice; putting it together, however is a bit fiddly.


The engine is very well detailed; most of it will be hidden, though if you choose to install it. For this reason I decided I’ll display it in front of the model, as I did with a couple of other kits before (T-34, T-44…)


The interior got the usual heavy treatment. I used a black primer (acrylic spray… since then I switched to Vallejo’s German Grey primer), which was followed by an enamel-based varnish, and Tamiya’s flat white. If you use high pressure, it can be sprayed with very little dilution, which will result in a solid cover (always an issue with white and yellow).

I used the windex chipping method to create worn surfaces, with the black showing through. The contrast is quite high; in retrospect I should have used some brown instead.

Once the model was try I used oil paints to create discoloration and streaks on the side-panels. The interior details are quite nice; the painting of the ammunition in the ammo rack is a pain in the neck, though. (There’s a choice of main guns; the machine gun option would leave you without this chore.)

The bottom of the engine compartment was treated with different AK and Vallejo products (engine grime, oil, fuel stains).

I took some artistic licence painting the engine; I tried how it would look like if I installed it, but eventually decided that it will be displayed outside of the tank.

Once the interior was finished I assembled the hull; the tank was ready for painting.


Sharkit’s AMX CDC -AMX Chasseur de Char 1/72

wieerxe

I had not known about this vehicle before it was introduced into the World of Tanks online arcade game. In the game it is a medium tank, but in reality (as much as we can discuss reality about a vehicle only existing on paper) it was planned to be a tank destroyer. The AMX CDC is a unique looking vehicle, so I was pretty excited to see it being issued in 1/72. From now on I’ll refer to the vehicle as CDC (or “tank”)…

A little background

The French armament industry was the second largest producer of tanks before WWII broke out. After the war the industry was in ruins, and the French army had no real modern tank in its inventory. Some clandestine tank development was pursued during German occupation, so it was not surprising that immediately after the liberation of France tank design started in earnest. Wisely decision makers realized that it was important to pursue development in order to retain the talent and expertise, and also to experiment with new ideas; the less-than-stellar designs of this period were only “placeholders” until “real tank design” could start. The immediate post war designs were built on pre-war French experience (the ARL-44 is a good example), and also borrowed a lot from the German heavy tank designs.

In 1945 the AMX company produced the AMX M4 armed with a 90mm gun. This tank was essentially a French Tiger II, and not a very good one at that: the vehicle was huge, lightly armored (so that the weight could be kept low), and had overlapping road wheels which were quite impractical. The power plant was a French variant of the Maybach HL295. Two prototypes were built for testing but they were deemed unsuccessful.

The AMX Chasseur de Char was designed on the basis of the AMX M4 chassis using a redesigned turret and non-overlapping road wheels. The tank not only existed only on paper, but the armor was essentially paper as well: 30mm frontal armor, 20mm all around armor, which explains why it was only 34 tonnes. Since there’s not much information available on this vehicle, let’s move on to the model itself.

In-game the tank is not a very good one. On paper it looks like a fast sniper, but the gun is rubbish; save your money, and only get the model. Or buy a Liberte 🙂


The kit comes in a sturdy cardboard box with a painting of the vehicle on the front. The instruction manual is a sheet of paper with the parts numbered, and a computer-generated rudimentary assembly diagram; it’s perfectly sufficient for the purpose. (Many resin kits don’t even come with instructions, so that’s always a plus.)

It has relatively few parts; the suspension arms and the road wheels take up most of your time assembling this model. The tracks come in sections which need to be warmed up before shaping them onto the idlers and the drive wheels. One issue with the model is, however, the texture of the resin. The model was obviously designed by computer and printed out using a 3D printer; the faint printing lines are still visible on the model. It’s quite a choir to sand them off.

The hull comes in two parts: a bottom and a top part. The fit is not very good, so some dry fitting and filling will be necessary. The detail is sparse, but it is a paper-panzer (or paper-char?) after all; there’s not much available on how it would have looked like. One thing that is prominent is the engine deck: it does resemble the Tiger II’s. Compared to the available drawing, the engine deck on the model is shallower. The drawing shows a much steeper angle towards the back.

The turret is also a simple assembly: the base fits into the turret shell comfortably. The gun is straight (not always the case with resin models), and, interestingly, the muzzle brake is mounted vertically, instead of the “traditional” horizontal position. I’m not sure why the designers felt they needed to put the muzzle break on this way: gun would have kicked up way more dust when fired, making the tank more visible and blinding the gunner even more, (Probably). I’m not an engineer or an expert, so take this with a grain of salt.)

The drive wheels have good detail, but they are very thin; it’s quite easy to break the resin while fitting the tracks. Since the teeth do not fit into the holes on the tracks without enlarging those, I simply elected to shave off the teeth that are in contact with the tracks. The road wheels are quite nicely detailed with all the bolt heads and ridges; the holes for the suspension will need to be enlarged, though, with a drill.

The position of road wheels is not marked on the hull; you will have to decide how low or high these wheels should sit before you glue the suspension to the hull. The positions of the return rollers are not marked, either. Looking at the drawing available they should be directly above the second, third and fourth road wheels.

The assembly stage took me about 3 hours -that with all the cleaning, filling and sanding necessary. You will need a fine saw in order to cut off the pouring blocks (and, as always, make sure resin dust is not dispersed in the process- use wet sanding/sawing methods). I have used green stuff to fill in the gaps between the hull halves; it served both as filler and an additional method of fixing the main parts together.

The tracks went on surprisingly easy (I find installing resin tracks a stressful exercise).


Painting
The model was primed with black, and then I used my best attempt at the French bluish-green color from World of Tanks, mixing Tamiya light see grey, medium blue and Caliban green by Citadel. The color was modulated with a bluish filter.

Once the paint dried I mixed up a 3% ammonia solution, and wore away some of the paint using the Windex chipping method. It’s a very simple method of creating worn away paint: wet the surface of the model with this solution, and using a stiff brush wear off some of the paint. Important to note that it only works with Tamiya paints. This method creates much more subtle abrasions and chafing than most of the other methods I know.

Once I was satisfied with the results, I sealed everything with varnish, and added some leftover decals from the Trumpeter B1 kit. The decals were sealed with another layer of varnish. I wanted to recreate the striped winter camo pattern from World of Tanks. Since the whitewash is pretty faded on that tank, I used Tamiya’s weathering master (the one that looks like a make-up set) to add white pigments onto the surface.

I’ve used Tamiya’s weathering stick (mud and sand) to make the lower chassis a bit dirtier. I bought these on a sale at Hobbycraft a couple of months ago, but had not really experimented with them yet. I did not apply the product directly; I dabbed them gently using a wet brush, and then dabbed this brush onto the surface of the model. Before it dried it was quite easy to adjust the effect with a wet brush.

I also added some tools I found to the front (my spares box is running low on 1/72 tools…), and added some Jerry cans to the back. The edges of the turret and hull were treated with metallic pigment using the same Tamiya make-up set.

Overall the tank is not a challenging build. It is not very detailed, and it’s a simple assembly; even for beginners. The price is somewhat high, but this is always the case with limited run resin kits; the question is if the uniqueness of the model is worth it for the you. For me it definitely did.

The tale of the four Luchs’ – the Maco Pz.Kpfw. II Luchs

Modelltrans’ Luchs

Flyhawk’s Luchs

…and still to come: Armory’s Luchs!

44hxf61

These years seem to be the golden years of scale models. Vehicles that have not been available or only available in the form of limited resin kits suddenly get a lot of attention. The Pz.Kpfw. II. Luchs was one of these vehicles. I’ve built the ModellTrans version five years ago, inspired by the online game World of Tanks, and now, in a very short span of time we get not one but three Braille scale plastic versions of the tank.

I have reviewed Flyhawk’s 1/72 Luchs offerings before, and I was really curious what the other Luchs kits are like. This review will be about the up-armored Maco offering; I’ll comment on the differences between this kit and the Flyhawk kit here and there during the review. (The up-armored Luchs is essentially the same as the basic Maco Luchs with a small fret added; anything I say here is relevant to all Maco kits.)

The breakdown of the model is quite old-school: we have a “traditional” lower hull assembly from four parts (two sides, a bottom and the back). The suspension units and the swing arms holding the roadwheels are already moulded onto the sides. There is an interesting solution for the last pair of braces on the mudguards: they are moulded onto the back panel. The mudguards will need to be slid under the brackets. Be careful not to cut them off; first I thought they were some sort of plastic overflow during the moulding process. As most of the finer details, the back light is moulded onto the left brace.

The added parts are on a separate sprue: the tool box from the back of the mudguards, the jerry cans for the turret sides (these were moved to the back of the tank in the Flyhawk up-armored Luchs kit), smoke grenade launchers, some extra boxes on the back of the turret, a metal armor plate for the lower hull on the front, the perforated vision block protector, and additional track sections protecting the frontal hull. Without this sprue you can build the early version of the model easily.

The interweaving road wheels are done the same way as DML handled them with their kits: the two inner rows of wheels form one part each, onto which you’ll have to attach the outermost row as individual wheels. This solution makes assembly much simpler, and it’s a great solution to avoid any misalignment. The pattern on the road wheels is very well replicated, and the wheels are very thin, which is probably quite true to scale. (Although it’s a conjecture on my part since I have no access to a real vehicle, and neither have I found any information on the thickness of the wheels anywhere.)

The drive wheel is nicely detailed, and the plastic is a tad thicker than the Flyhawk kit’s- this is actually a good thing, because it can easily bend when you are trying to install the tracks on the Flyhawk model. The tracks come as link-and-length, and they are very easy to assemble. (They are probably the easiest I’ve had so far in 1/72.)

The upper hull and the mudguards come as one piece. The model is really “traditional” in this sense as well: the sides of the hull will need to be fitted as separate parts due to the details (viewing ports) that need to be there; no slide-moulds for this kit. The fit is remarkably good, though, so no problems there.

The model does not come with many PE parts: we get the top of the German “crow’s foot” antenna, and that’s it. We also get a couple of brass items: the rod part of this antenna, another whip aerial, and a turned barrel. (The thin metal aerial with the “crow’s foot” looks much more convincing than Flyhawk’s version of plastic rod combined with the metal top.)

The tools -with the exception of the jack, the fire extinguisher, and the shovel- are moulded onto the mudguard; this is something I’m not very keen on. (I prefer painting them separately before attaching them onto the model.) The shovel is a pretty simple affair; it’s probably better to replace it from the spares bin. The model does not have a width indicator; you should get a PE one (Dan Taylor modelworks does a set), or fashion one from stretched sprue. They were too fragile in the Flyhawk kit that I just used PE aftermarket ones instead of trying to clean them up. The tool boxes are slightly different than in the Flyhawk kit, and their locations are not exactly the same, either- again, these could be simply because the models were based on different production versions.

The turret is made out of five parts; the plastic barrel is molded on the top section. Interesting solution (both the assembly of the turret and the gun barrel), and it works. You have an option for a metal barrel, which is nicely detailed. The only imperfection I found with the kit was the grab handle on the back: it was broken and bent during transit. (I ended up not changing it.) The other issue I have with the turret is the almost perfectly rectangular shape of the top of the turret; I think it’s a bit larger than it should be- it’s certainly larger than the Flyhawk’s turret. (Which is also smaller than the ModellTrans turret). The shape is not the same, either. The Flyhawk kit’s turret is more hexagonal: the back and the front are a bit narrower than the middle. In the Maco kit it’s more rectangular. It also looks like the top is a bit larger than on the drawings I found online. The big question is which one is correct. I don’t have access to an actual tank to check, and the photos I found were taken mainly from eye level -for obvious reasons. (If there’s one in Bovingdon I’ll keep an eye out next time I get there.)

The top turret hatch (the commander’s) can be opened. The hatch has interior details, but the rest of the turret does not; it’s probably best to put a figure in it if you leave it open. The back large, rectangular hatch cannot be opened.

The assembly was about two hours -tops; it’s a very well engineered, easy to assemble kit. I tried something new (for me) in this build, and made the whole running gear/track assembly as a single sub-assembly; the whole shebang can be removed for painting and weathering. (I think I’ll use this approach in the future more often.)

The painting was a bit more difficult, as I am not really good with spraying 1/72 freehand camo. I’ve base-coated the model with primer red, and used Mig Ammo’s Dunkelgelb. Obviously neither my airbrush nor my skills were up to the challenge of making thin sprayed on lines, but here I had an idea of pure genius. (If I can be as bold as to call it that.) The Ammo acrylic paints form a cured surface; they are very different from the Tamiya paints. And, as we know from experimenting with the Windex chipping method, Tamiya paints are dissolved by ammonia… I simply made up a 2-3% ammonia solution, and used a brush to carefully clean up the overspray.

Job done.

This is something definitely worth remembering; as long as the base layer is different (either enamel, or, in this case, Mig’s Acrylic paint), you can clean the Tamiya top layer up easily. (I did not take a photo after applying the green, but imagine the yellow areas having a greenish oversrpay all over.)

The weathering steps further helped with the camo issues. Some dust (pigments mixed with water and some surfactant sprayed onto the model), washes all made the base color a bit darker, and helped to fade the green patches a bit. The silver pencil really helped making the model look like a chunk of metal.

I’ve used different colors of mud (in this case I used Vallejo’s and AK’s sets, not pigments). The key is to first use the lighter colors on a larger area (both flicking it on, and by applying with a brush directly), representing the dried under-layer, and then add the darker shades, representing the still wet mud. With a brush moistened with the appropriate solvent (water in case of Vallejo, white spirit with AK) you can -and should- adjust the effect before the layer dries.

Conclusion

The Flyhawk kit is an incredibly detailed, albeit complex model, which will challenge the model builder. The Maco kit is a very well detailed, well engineered, easy to assemble model. Sure, it does not pack as many PE parts and tiny plastic bits, but it does make the build less of a challenge, and the results are still nice. The moulded on detail is convincing, and it is nice to have a model that is a breeze to build. In my subjective opinion it is on the same level as the Revell 1/72 Famo in the quality of plastic, ease of assembly and level of detail. (In other words: pretty darn good.)

It comes with a metal gun barrel, and two metal aerials -things the Flyhawk kit lacks. On the other hand it does not have a PE engine deck grille unfortunately.

In short: if you want to go all-out, and have a challenging build, go for the Flyhawk one. If you want a good, easy to build model, which builds fast, choose the Maco model; in this fortunate case we have an abundance of choice when it comes to this vehicle.

Coming up: Armory’s offering.

Chipping techniques- washable paints, hairspray and Windex chipping

I was curious how some chipping methods compare, so I did some experiments. Since the old hairspray I used ran out, and I could not get a similar product, I switched to the AK chipping fluid. (Not all hairsprays are the same when it comes to chipping; if you find something that works, stick to it.)

I also wanted to see how the Windex chipping technique works, and what the Mig Ammo washable white paint does. It’s not a comprehensive tutorial by any means, but I hope others find it useful.

Hairspray technique

ak0892

There’s a nice summary of the hairspray technique on another blog, so I won’t be taking up much space with it. It essentially works by forming a water soluble layer between two paint layers, which makes a chipping effect once water is applied and slightly macerated with a stiff brush or toothpick. It can be applied to simulate paint chips or worn white wash; I used white in this case. With the AK Interactive product there’s a time factor: the earlier you do the chipping after the paint is dried, the larger the chips are; the longer you wait, the more difficult it becomes to remove the top layer. This can be used for your advantage, as it also allows you to use it in conjunction with the Windex chipping technique.

Windex chipping

ey4wzqd

This is something relatively new. I’ve read about it in the Single Model series (02) by Rinaldi Studio Press. This technique depends on the fact that ammonia dissolves Tamiya (and supposedly similar acrylic) paints. You essentially dissolve the top layer with a 1-3% ammonia solution. (Windex and similar cleaning products contain ammonia; you can even buy ammonia by itself, and it would work just as fine.) The higher the ammonia concentration, the easier you remove the top paint layer, so it’s worth being patient and using less concentrated solutions. I used to use Windex as a solvent and airbrush cleaner; it seems like it’s great for chips as well. The effect is much more subtle than the hairspray technique’s: it produces smaller chips, and the effect is more like rubbed-off paint.

Mig Ammo washable white

washable-white-camo

It’s essentially a white paint that can be spray painted and then washed off after drying. It does not form chips as it is; it’s more like a whitish translucent overcoat. The paint should not be diluted much (one or two drops of water, tops), as it would spray very dilute. (It took a while to figure out why it behaves like a wash when I sprayed it… The Lowe I did was the test piece, and I had to try three times before I realized I needed to keep the dilution low. It’s quite thick, so some dilution is necessary, but not much.) I’m not sure it stays washable after a prolonged period of time; it probably does.

Onto the test…

So I prepared my trusty Pnz IV mudguards with a green layer of paint, and sealed it with Dullcote. (So that it protects the paint from the ammonia.) The next layer was Tamiya’s flat white.

I divided up the segments, and got working. (I forgot to take a photo before I started to work on the AK Interactive chipping fluid. Imagine it white.)

AK Interactive Chipping fluid

I used a wet brush on the surface, and then gently a toothpick to nick the surface. The nicks were enlarged with a large, relatively stiff wet brush.

The resulting chips are giving a stark contrast between the white and the underlying green.

g0m6ojc

Mig Ammo Washable White

The paint is very thick and kind of shiny once on the surface (you can see this on the photo). After a little drying period, I used a wet brush with a downward motion to remove the paint. It got dissolved, and smeared over the surface. The residual paint formed an uneven layer over the green paint, making the surface look worn. No chips, but realistic worn effect.

azelryk

The Windex Chipping method

I prepared a ~2% Ammonia solution using a kitchen cleaning product, and used a brush to wet the surface with it. I waited a minute or two and then gently rubbed the brush against the surface. For a long time nothing seemed to happen, but after a while I got a very nice, realistic chipping effect. It’s an important thing to point out: the effect is very gradual; for a while it really does look like nothing is happening. Some foam appears, but that’s it. Don’t push the brush down (now I’m rapping about modelling), as it might lift up the base layer as well.

9i28pok

You can see the same technique used to recreate rust on the electric mule I built not long ago. The square parts are about 0.5cm long. Unfortunately the photo is not the best (the most interesting part is out of focus), but the effect can still be judged: tiny, minuscule chips and general look of wear-and-tear. Pretty good, I’d say.

8pdzxnu

AK Interactive Chipping fluid and Windex combined

The fourth section was first treated with the AK Interactive chipping fluid, did the chips, then waited a couple of days. (It was probably close to a week, if I recall correctly.) The next step was to use the Windex method on the same section, forming smaller chips. The effects are subtle next to the large chips, but you can see how the paint rubbed off the edges and other areas sticking out. It also formed very tiny little chips between the larger ones, making the effect a bit more realistic. The Windex effects complements the larger chips of the previous method quite nicely. Due to dissolving the white color, it also deposited some on the green undercoat, making the contrast less pronounced in some areas. (Not all and not evenly.)

gukgrdy

tkysiid7c2k2ax

So there is it.

I think the washable paint looks good as a very worn winter whitewash on its own. If you use hairspray chipping for whitewash it would also be very useful to tone down the stark contrast between the underlying paint and the white on top.

The Windex method is great for subtle chips, but it also complements the larger hairspray chipping.

This, of course, is not limited to whitewashes; excellent chips can be done using a rust undercolor, or even a variation of the main color. (Green on green chips, camo pattern chips, etc.) Your imagination is the limit.

There are more than one ways to skin a cat, so these are not the definitive methods; there are other ones as well. AK Interactive just came out with a solution that makes any acrylic paint washable; the this opens up a large potential of uses from dust to worn paint. I have ordered it, so when I have some time I’ll see what it can do, and post the results.


(Here’s an imgur album for the photos- they are hopefully larger than the wordpress versions.)