Tag Archives: OKB Grigorov

1/72 AMX-40 by OKB Grigorov

l7eiuen

This is one of those tanks that definitely has a lot of personality. From absolute obscurity it was launched into the general consciousness* by the online game World of Tanks, which features it as a tier IV light tank. It has a certain notoriety as it is certainly one of the worst tanks in the game, but despite of this it became somewhat of a legend (or a cult, rather) simply due to its quite unique looks. It’s a sort of hipster tank, just like the Churchill Gun Carrier. The WoT community has created several amusing memes around it, and it has its own nickname: “The Duck”. Right now the only mod I run with the game is the “rubber duck” custom paintjob. (See below)

*Well, more accurately, into the general consciousness of a certain gaming community…

The unique look of the tank is the result of its designers taking the idea of sloped armour to its limits. The plans were drawn up in 1940 as a replacement option for the S35 and S40 cavalry tanks, but due to the German invasion these plans did not materialise; no prototypes were ever built. (To be fair it would have probably performed just as bad in real life against panzer IIIs and IVs as it does in-game.) The only contemporary image of this strange-looking tank available online is a drawing. The tank did inspire a lot of online creativity, thought…

gdq57kx

I have been toying around with Blender trying to make a printable model of this tank, but so far my efforts are less than satisfactory. (I’m not giving up, though; if I succeed I will paint it in the Rubber Duck scheme.) Needless to say when I saw that OKB is producing a version of this vehicle I ordered one at once. I quite like this feedback of computer games into the scale model industry; a lot of newer releases (KV-4, AT2, etc.) were clearly inspired by the weirder prototypes, paper panzers popularized by WoT.

The kit comes in a typical OKB box, the parts placed into ziplock bags. The instructions are computer generated and quite simple, but this is a simple model after all. Once you finish the suspension/running gear (I have no idea if they are accurate), you’re essentially finished. It comes with two PE parts, and two transparent resin pieces for the headlights. It lacks the back-mounted machine gun that was planned (that up-pointing gun mounted behind the turret). Other than that it looks very similar to the blueprint, but distinctly different from its in-game representation. (Which is a shame, because the WoT turret with its secondary machine gun turret looks much better in my opinion. It’s absolutely fictional, but looks trump historical accuracy. Well, this is what Blender is for, I guess.)

The model went together without a hitch. The suspension arms fit well, the wheels went on nicely, and the tracks were a breeze to install; that was pretty much the extent of the build, really. Apart from this I had to glue the turret and the gun in place, install the headlights, and add the side-skirts. The building process took about an hour. The only tricky part was to fix the side-skirts onto the curved profile of the tank.

The painting was also pretty easy: I primed the model with the side-skirts off with Vallejo’s German Grey primer, and applied AK’s Chipping Fluid. Once dry, I mixed up the (fictional) blue-gray color from WoT using Tamiya paints, and misted it over the model in several layers. This was followed by some moderate chipping using a wet, stiff brush.

When the model was dry, I used some oil-paint based filters (light brown, blue) to modulate the base color somewhat, and sealed everything with gloss varnish.

Unfortunately there are no decals provided with the model.

After weeks of consideration I decided to test out printing waterslide decals using an inkjet printer. The results were not satisfactory (I used transparent decal paper instead of white, and the colors are very faint), but life is about learning, right? If you want to have faded markings, print decals -that’s my conclusion. The other -bigger problem- is the thickness of the decals; they are just not going onto the surface very well, you can see silvering despite of soaking the whole model in decal softeners, and in general, just being crappy decals. Conclusion? Buy an aftermarket set next time…

The headlights were painted using a chrome pen.

I added the decals, sealed them, and painted on some more scratches and chips. Using Tamiya’s makeup set I added some dust on the lower part of the chassis; and this concludes the painting and weathering phase; the Duck is ready.

Overall the model is nice: well designed, easy to assemble, and unique-looking. The price is moderately high, but affordable; it’s great as a weekend project (or for the true fans of Le’Duck).

1/72 M56 Scorpion – OKB Grigorov

fy1jqcd1

I’ve written an in-box review of this model for Armorama; I think it’s time to show how it looks when finished.

The M56 Scorpion was an attempt to supply a gun platform for the US airborne forces that can be easily transported by airplanes, and can be deployed using an air-drop. This requirement pretty much made it impossible for the vehicle to be armored, so it is essentially a gigantic 90mm M54 gun on a dodgem chassis. Crew comfort (and safety) also took second place to the size requirements that came with the airborne deployment option.

The M56 was developed and manufactured by the Cadillac Motor Car Division of GM from 1953 to 1959. It was a small, fully tracked vehicle, powered by a 200 hp engine with a maximum road speed of 45 km/h. It had a crew of four: commander, driver, loader, gunner. The ergonomics of the vehicle were, let’s put it lightly, not very good. The loader had to disembark before the gun fired, and jump back holding the ammunition. The gun recoil also endangered the commander. The only part that can be considered armor on the vehicle is the gun shield, which has a large windscreen cut into for the driver negating its effectiveness somewhat; the rest of the self-propelled gun is about as armored as my Nissan Micra. (Another thing that it has in common with my Micra is that it has pneumatic tires…)

The M56 was in service in the USA, Spain, Morocco, and the Republic of Korea. It was used in Vietnam by the 173rd Airborne Brigade.

There are not many models available of this little AFV; I’ve found a very expensive resin one in 1/35th scale by Hobby Fan, and there’s an old OOP (and quite inaccurate) Revell kit; other than that there’s the 1/72nd scale OKB kit reviewed here. As usual, World of Tanks introduced me to this vehicle, where it is a premium American tank destroyer; and since I liked the way it looked (and have it in my garage) I was really anxious to get a model of it.


Considering the size of this vehicle the number of parts (especially the amount of PE) is quite high. The model is made up by approximately 70 resin pieces and about 70 PE parts… all this is in a model that can almost fit into a matchbox.

The resin is smooth, and of different color. The detail is crisp, and the fit is quite good generally. The PE frets are the thinnest I’ve ever seen. (It’s quite easy to crumple them, so be careful; it feels like a thick aluminium foil rather than photo-etched brass.) The tracks come as resin sections which need to be warmed up before shaped to the running gear. The detail is excellent, and there is very little flash anywhere.


The instructions are computer generated, and frankly, not very helpful. They show different views of the assembled model, but unfortunately do not instruct on actually how to put the model together. Before gluing make sure you understand how the parts should be fitting; I did make a couple of mistakes during assembly.

The exhausts for the engine seem to be shorter; there should be a section that is turning down at a right angle from the end of the exhaust pipes.

First mistake I made was to wait with the mud guard until I finished with the running gear.

If you decide to give this kit a go, make sure you glue the mudguard onto the hull first. The simple reason is that the PE covers the whole side with cutouts for the suspension units. These holes are way too tight to slide it over the suspension if it’s already in place. I had to widen these holes considerably in order to be able to fit the mudguards into place.

The other big issue for me was the suspension arms. They look very similar, but the front and rear suspension are not identical. I accidentally mixed up on one side, and hence the wheels are a bit wonky.

Other than that, most of the model went together OK. I had to make the headlight protectors out of thin wire (I normally use soldering wire as it’s quite soft). The tracks were somewhat thick and rigid, but with a lot of patience (and hot water) they did go on eventually. The hole on the gun shield has a plexi protector for the driver; I left it completely empty, since any transparent acetate sheet would look foggy and thick in this scale. (I would need something that’s about 0.2-0.3mm thick.)

I’m not sure that the back platform is depicted as open or closed up; probably closed up due to the 2 PE rails sticking out of them. (If it’s folded down, it should be longer; if it’s folded up, it should have some extra bits for the mechanism that keeps it straight in a folded -off state.) I also noticed a bit late that the loader’s seat was left off… my mistake.

The model went through multiple rounds of priming, as usual. These coats were applied more for checking for mistakes and seams rather than to provide a base coat for the paint, and was applied using a spray-can. The model was ready (I left the gun detached for easier painting), I added a final coat, and then applied Tamiya Olive Drab lightened with some Tan. (The first two photos of the painted model show the color to be a bit too greenish, flat and dull.)
A bit of yellow and ochre filter later the green became quite nice with some brownish hues. I could not find any decals that were small enough to fit onto the model, so it remained un-marked. I used Tamiya’s weathering kit (the makeup set) to apply dust and mud to the vehicle, a silver pen around the edges, to give it a metallic shine, and called it a day.


Altogether, the model was a pretty pleasant build -except for the little issues I mentioned. It is certainly quite pricey, as all OKB kits are, but, just like in the case of the Batchat, you really have no other options. Overall I’m pretty satisfied with the results; it is a well recommended model of a very rare subject.

OKB Grigorov Batignolles-Chatillion Char 25T (Batchat) 1/72

1qweuir

One of the positive things of the game World of Tanks is that it introduced a lot of obscure vehicles to the wider audience. I’m not sure how many of us have heard of the Batignolles-Chatillion Char 25T aside from for French armor enthusiasts… and now at least 45 million people know of this vehicle. The fame did not come with scale models flooding the market (yet), so I was really happy to see that OKB issued this model in 1/72.

The Char 25T was developed by the Batignolles-Chatillon company (hence the name). Interestingly the company produced trains and locomotives; tanks were a new frontier for them. It was to be a main battle tank, designed around similar principles as the AMX-13: oscillating turret, a 90mm F-3 gun with a magazine/drum type autoloader, low silhouette, and sloped armor (80mm on the front). It featured a hydraulic suspension with six road wheels on each side. The tank was very small (5.67 meters long, 3.16 meters wide and, 2.37 tall), very light (25 tons), and not surprisingly it was highly mobile (65km/h top speed); also somewhat unsurprisingly armor was not exactly strong. It had a crew of four: a commander, a driver, a gunner and a radio operator. The design lost to the more conservative AMX-30, and hence never entered into production. Reliability issues, the oscillating turret, the autoloader (the tank needed to stop and the crew had to exit to reload the gun), and the lack of NBC (nuclear, biological, chemical) protection all played a part in the failure of the prototypes in the trials.

The only reason I know about this tank is World of Tanks; it is one of the best end-tier medium tanks in the game. (Well, was. It’s been nerfed not long ago.) It also looks quite unique, so obviously it was one of my first ever purchases from OKB. (Their models tend to be expensive, so it’s not something I do every day. Every purchase is being considered and mulled over for several weeks.)

The model is made up by over a hundred resin pieces and ten PE parts. The parts are very well detailed, the flash is minimal, and the fit is good (when I attached the side to the main hull I needed to use some filler in the front though, so it’s not perfect). The headlights come as transparent pieces, which is something I’ve never seen before in a resin model.

The tracks are given as sets of straight resin pieces, which need to be warmed up before shaped to the running gear. (I prefer to use hot –not too hot- water.) The hull and the turret come as one piece (each); most of the small parts make up the running gear. The photoetched fret is very thin and very delicate; it’s very easy to bend (even crumple) the parts; this is something to look out for. (It would be better if they were a bit sturdier) There is very little information available on this vehicle, so I cannot really comment on the accuracy of the kit; it measures up to the published measurements I could find quite well.

Normally with resin models the suspension is moulded as one part; in this case the elaborate suspension is made up by several small parts (most of the parts of the model are parts of the suspension). The assembly is not very difficult but a fine pair of tweezers is a must have. The fit is surprisingly good, but I ran into a small problem with the road wheels. Due to small misalignments in the suspension arms, the road wheels did not align perfectly; they were a bit wonky. I put the model in some warm (~50C) water and set them straight between two rulers; once the resin cooled the alignment was much better.

The tracks were also warmed up using warm water, and wrapped around the road wheels, drive wheel, return rollers and idler. Since one section will only cover about 2/3rd of the required length, two will need to be used per side.

Once the tracks were installed I glued the sides of the hull on. There was a small gap on one side which needed to be filled; nothing major there. The front part of the mudguards are PE parts which need to be gently bent. It would be nice to have a larger flap that goes under the hull to help gluing them in place.

The lights on the back and their PE covers were a bit difficult to install as the PE kept bending to the slightest touch. (The lights need to be pushed into the holes in the PE covers.) A couple of small PE parts (towing hooks, etc) were attached to the back of the hull and the resin gun lock to the front. (I managed to lose the top part of the gun lock, and somehow the headlights… We’re in the middle of moving right now, and parts do get misplaced, unfortunately.) The thinness of the PE is an issue, as it is very easy to bend or distort the pieces during handling.

The turret was pretty easy to finish: top of the fume extractor, the smoke grenade launchers, a rectangular piece of unknown function and the gun barrel had to be attached, and the tank was essentially done. The gun barrel is slightly crooked; I tried to straighten it using hot water, but gave up eventually; I did not want to make the issue worse.


The painting and weathering did not take long- after all, it was an experimental tank. I chose a hypothetical camo using World of Tanks as an inspiration, and used an airbrush to apply it free-hand. I did a couple of light-brown filters to blend the colors together.

I covered the model with varnish, applied the leftover decals from Trumpeter’s B1 (the subject of the very first post of this blog). I’ve used these decals for other French tanks (ARL-44) before; my French markings are now officially depleted. Another varnish layer sealed the decals (this time I used Matte). Washes, some dust applied using pigments, and some mud (again with pigments); that’s pretty much it.

The model, overall, is quite easy to build, even for beginners. The running gear/suspension is a bit difficult to align, but there are ways to correct smaller problems. The price is a bit high, but there is no other alternative of you want to build a Batignolles-Chatillion Char 25T in any scale, so there you go.

Object 279 (1/72 OKB Grigorov)

ama2wkw

I have written a review of this kit for Armorama; most of the introduction is reused for this post. Should you wish to see one moving, check this link out.

There are three 1/35 kits available for this tank, all of which were issued in recent years -so officially there are more models than actual vehicles in existence. (Something only the Tiger I has achieved to this day.*) Before the styrene versions came out almost at the same time (which makes me wonder how companies decide on what to work on next and why they always seem to decide on the same vehicle**), there was a 1/72 resin version by OKB of this extraordinary-looking tank. Frankly, it looks like the tracks were only an afterthought; you’d expect to find anti-gravity propulsion installed. (Perhaps the subcontractors were late with that project.)

*~ducks~

**these days we can all anticipate the incoming new King Tiger kits with full interiors… it’s an interesting choice to flood the market with something that someone already is producing instead of coming out with something new. This enigma, along with the tendency of Hollywood to do the same thing with movies, will always perplex me.

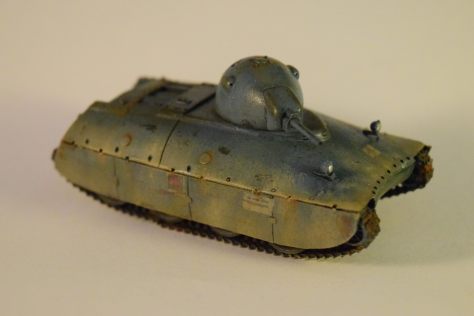
The tank was designed in the Kirov Plant in 1957 to resist HEAT ammunition and have good off-road capabilities (the ground pressure was less than 0.6 kg/cm2). The weird shape would also ensure that the maintenance would be a nightmare for the crew -especially if the tank threw a track. Surprisingly it was able to reach 55km/h, and had a range of 300km, which is pretty good for a heavy tank-  even more so for one with four sets of tracks. (Decreased air resistance due to the shape of the hull might have something to do with this…)

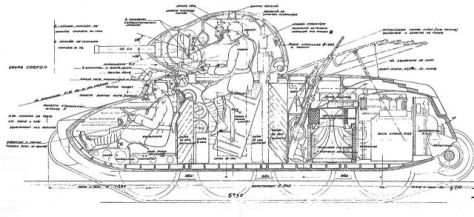
The shape of this tank was due to a second layer of shielding which covered the hull. It served multiple purposes. First of all it was supposed to make it harder to flip the tank over (nuclear blasts do tend to have some strong shockwaves). It also worked as a protection against HEAT and APDS projectiles, and against shaped charges. (I really would like to crawl into the prototype displayed in Kubnika to see what the interior looks like.) The tank was obviously equipped with CBRN protection. The main armament was a rifled, 130mm gun (M-65) with 24 rounds of ammunition, the secondary armament was a KPVT coaxial machine gun; they were stabilized in two planes.

The history of the tank was not very illustrious. Once the prototype completed all its trials (which showed a couple of problems with the track system), the program was axed by Khrushchev himself, as it was way too heavy for the requirements set for new tanks. (In short, the Soviet leadership viewed heavy tanks as outdated, and were obviously blind to the propaganda value of a weapon created apparently using alien technology.)

It took me some serious deliberation to purchase the Braille scale version of this model by OKB as it costs about the same (or more in some cases) as the 1/35 versions. In the end I’ve decided to go with it as I prefer this scale in case for large vehicles. I have a constant space shortage at home, which is the main reason my 1/144 Dora stays in her box for now.

Interestingly as I was progressing with the build, Wargaming just came out with a video on the tank itself.

The model comes in a small, sturdy cardboard box. The box art is a photo of the vehicle displayed at Kubnika; however it was seriously faded in my kit. In it we find several small Ziploc bags, and some pieces of bubble wrap which make sure that the kit arrives unharmed and undamaged.
The instructions –which are a rare thing indeed in resin model circles- are clear and computer generated. The only problem is that it’s difficult to see the images as they were pretty faded. (OKB will email you a set of instructions if you ask them ASAP, so this is not an issue.) Since the model is relatively simple, even using the faded instructions does not impact on the assembly process.

The model is made up by about 70 resin pieces and 30 PE parts. The parts are very well detailed, the flash is minimal, and the fit is excellent. One of the swing arms of the suspension was miscast, but generally the quality of resin is excellent.

The tracks are given as sets of straight resin pieces, which need to be warmed up before being shaped to fit the running gear. (I prefer hot –not too hot- water to a hair dryer for this job. Hairdryers can be surprisingly hot, and damage the resin.) The hull comes in one piece; most of the small parts make up the running gear. The muzzle break on the gun is something to be seen: it’s quite a complex shape with several openings and it’s moulded in one piece; A pretty impressive affair. The photoetched fret is very thin and very delicate; it’s very easy to bend (even crumple) the parts, which makes working with them a bit difficult.

Putting the running gear together was not very difficult; the swing arms fit into their slots remarkably well. (The small wobbling unfortunately will show when you attach the wheels, as they will be somewhat misaligned. When the suspension units are done, it’s best to use some hot water to warm the whole thing up, align everything between two rulers, and wait for the resin to cool down.

I would have preferred to put the tracks on while the assembly was off the hull but the drive wheels are separate units. This means you’ll need to glue both the running gear and the drive wheels onto the bottom of the hull first, then add the tracks. To make your life easier you can add the front section of the tracks on the suspension while they are off the hull.

Now, there was a little issue at this point: one of the sections holding the running gear did not fit into the groove on the lower hull. After a little fiddling I found the reason: it was a couple of millimeters longer than the other. Some trimming had to be done to make it fit. Another issue I’ve already mentioned: one of the suspension arms had a casting error, so it was too short to add a wheel. I made sure this section was turned inwards so it would not be seen.

The face of the drive wheels is made out of PE. As I said the PE bends very easily, so assembly was not exactly easy. (They bend readily even to the small pressure needed to push them in place.) Since the resin axles were a bit thicker than the holes in the PE parts I needed to trim them a bit using a knife. I used epoxy glue for most of these parts, since I wanted to make sure they will hold strong; this is important especially when you install the tracks.

Once the drive wheels and the whole running gear was on the tank, I added the tracks. (Warm them up, wrap them around the running gear, wait.) There are some tight fits between the running gear and the bottom of the hull, but all four sections went on eventually.

The hull is not a difficult affair to assemble: you need to add the towing hooks, the PE tiedowns for the external fuel tanks on the back, and the PE handholds. These handholds were a bit problematic: you need to fold the legs down, but there is no marking where to fold; these markings usually make it easier to fold the part in a neat right angle. Use a plyer or a hold-and-fold. The metal is very thin, so it is extremely easy to distort its shape while working with it.

The travel lock is made out of PE (not sure if you can make it functional; the gun barrel is made out of several pieces, so technically it should be possible.) The headlights and the guards for the headlights are pretty easy to install. I noticed that the metal strips for the guards are somewhat longer than necessary, so I trimmed them, and made a little fold at the ends so they stick better to the hull. The exhaust has a rectangular metallic guard around it.

The gun barrel made out of several sections, and it’s kind of hard to make all the pieces align perfectly straight. The muzzle break, as I said, looks really great.

The turret is also a simple affair There are two PE squares on the top (I think this is where they are supposed to be- it was hard to see on the instructions and the photos were not very good for that angle). The IR headlight is fixed next to the gun, I’ve prepared a couple of handholds using wire, and attached the gun barrel; that’s it. (Obviously I only primed the tank so far; it will be finished after the Christmas holiday.)

Once I had the rust-brown base coat on, I’ve sprayed some Tamiya Nato green lightened with tan, and mixed with some AK Washable agent as a test. The test was a partial success – some vigorous brushing did manage to remove some of the paint. Clearly more experiments are needed with different paint/agent ratio. Once the paint was dry I fixed everything with some varnish and added some decals from the leftovers. The decals were fixed with some Dullcote.

I proceeded to add oil washes, and some light ochre filters, and went on to see how I can make the tank look dirtied up without overdoing the effect.

I picked up some Tamiya weathering sticks in HobbyCraft at their latest sale, so that was the first stop. It’s a strange, almost lipstick like product (pen shaped), and direct application only deposits some non-realistic smears. Using a stiff brush to add the paste and adjusting the pattern after application with a wet brush seemed to work well, though. I used the mud version to add mud on the lower chassis and the running gear, along with the edges of the top of the tank; and I used dust to add deposited dust/dry mud onto the top. With downwards stokes I tried create a perpendicular pattern to the edges as if they were marks made by the water pouring/tickling down from the hull. I repeated the process on the turret as well although much more subtly.

Since it did not look enough (only two colors do not look very convincing) I’ve mixed up some darkish (almost black) brown mixture of pigments and matte varnish, and flicked it onto the hull with a brush and toothpick to simulate fresh mud splashes.

I’ve used some weathering effects (oil stains and diesel stains) on the running gear and the external fuel tanks, respectively), and called the tank finished.
The build was not a challenging one; in fact it was easier to build than most resin models I’ve built so far. This is the third OKB model I’ve built, and I have to say they are very well engineered models: clear instructions, good detail, and no major issues to remedy. The only real drawback is the price- for most people this would make the 1/35 offerings more attractive.