Category Archives: miniart

MiniArt T-44 Build review p4. Coming together


Well, this is when the tank is starting to take shape, and resemble an AFV. The top of the turret was glued in place finally, hiding a lot of the details in the interior. (I was tempted to do a “cutaway” version, but I could not find a part I was comfortable cutting away; the whole of the interior is crammed with things.) The turret roof is a very thin piece of plastic; I think MiniArt made it pretty close to scale thickness. (I don’t have the instruments to measure it accurately, though.)

r3vr4kwjzbz0qujhfzc6ufptj30itwee4dzktua744

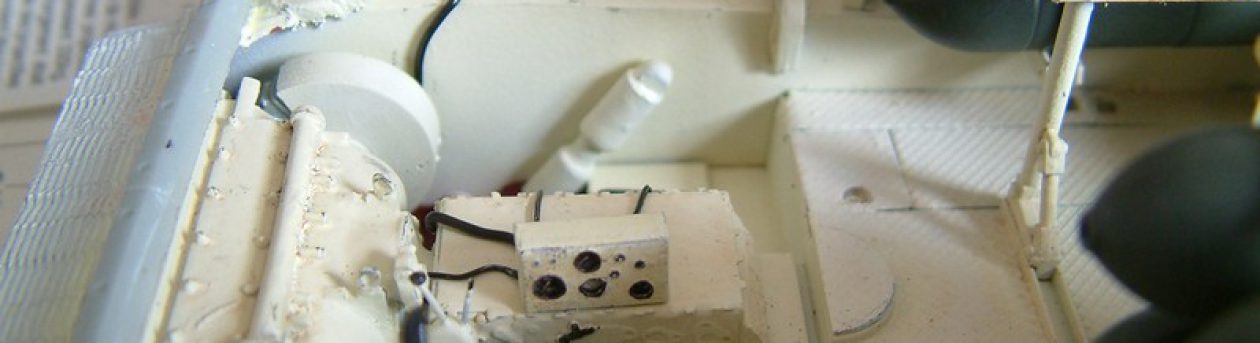
The interior of the turret is quite busy, and frankly brilliant. The fume extractor, the small lights, the radio, the turret cranking mechanism, all the other details are just great. You do get the fan for the fume extractor, but it will be hidden by the PE cover. The periscopes are made out of transparent plastic. The commander’s cupola has the very fine teeth where the cupola’s turning mechanism is meshed to; small details like this make the model really shine. I was worried about installing the PE holders for the pistol gun port plug, but they snap on surprisingly easy (considering how small the pieces are). I think there might be a chain holding the plug itself in the real tank, but it was not included; if you want to depict them open, you’ll need to add the chains.

63h9uownp0pzep

Pistol port…dqoxvvsk8v5wcc2ucbmsrw6kvldlo5wmqtg

Once all was done inside the hull, I started to add the armor plates protecting the front and the top. The frontal, angular plate fitted perfectly. (I would suggest leaving the splash guard off until the front plate is in place.) The top plate is probably scaled so that it’s scale thickness (it’s noticeably thinner than the side or frontal plates), however, there were some fit issues with it. Nothing that some patience could not solve: I went ahead and did what I did with the hull and the mudguards, and glued it on section by section, while holding the hull in place with clamps. Once the model was reasonably ready, I added the extra bits which I left off. I usually attach the tools, headlights, etc. last, so that I don’t damage them in subsequent steps of the build.


yyvqhgpdyaioer

I chose to attach the mudguards before I installed the running gear; I think it would be better to do the other way around. The detail is pretty good, and the assembly is straightforward to build. The problem is that the attachment to the hull is somewhat problematic. First of all, there are no locating holes on the sides for the little pegs on the mudguards; you either drill these out, or cut the pegs off. Once everything is on, the PE straps “holding” the external fuel tanks need to be installed. These are two-part assemblies each: one metal strap and one tiny U shaped part that is originally welded to the hull, and used to fasten the strap to.

2tbrzv9


Before installing the road wheels and tracks I’ve painted the side of the hull green, and muddied it up with several layers of pigments dissolved in white spirit. I used light brown colors first on the side, and then went darker and darker, making sure I cover smaller areas with the subsequent layers. I also used a clean brush moistened with white spirit to adjust the layers once they dried.


The road wheels are simple to assemble, however, the peg that supposed to hold each wheel is tiny (about 3 mm long…) In theory you can assemble the wheels so that these pegs can rotate, but I did not bother with this; they were glued in. I also used epoxy glue, as I said, to make sure the wheels stay in place once attached to the swing arms –and since I will display the model on a flat surface, I also glued the torsion bars in place… Leave the return rollers and the drive wheels off; the tracks will be simpler to attach if you attach them together. The tracks are really nice; the detail is very good on them, but as I mentioned, they are not “workable”. You will need to glue them on. I could not put the whole 70+ link assembly together without it coming to pieces, so I just assembled sections, applied thin model glue to the joints, waited an hour, and then put them in place. Once the tracks were dry, I removed them (I left them in two large pieces on each side), painted and weathered them, and glued them in place for good.

The tracks were painted dark grey first, and then I used similar dark brown pigments diluted in white spirit to add rust and dirt. I keep seeing incredibly muddy tracks on models, where the pattern is essentially hidden by the caked-on pigments, which is not very realistic. (Well, there ARE instances; the spring/autumn mud in Russia would put a lie to this statement.) Nevertheless, I opted for a relatively clean set of tracks, as any movement would wipe and shake most of the dirt off. In fact, five-ten minutes of movement would polish the tracks shiny, and free of rust.

For green I started with Tamiya’s Dark Green. I fogged it onto the black primer, and then added subsequent layers lightened with yellow. The color will be further modulated with yellowish filters, and then with the dot filter method.

9rkdmrd


wbqcal0

Now it looks like a tank…tvtezwf

There is one major problem with the turret ring: the turret does not fit well. As usual with tank models, the turret is attached by sliding two little pegs into two corresponding openings, and then rotating it. This should lock the turret in place. The problem, as far as I can see, is that these pegs are very tiny, and simply do not hold the turret (or cannot click into place to begin with). Gluing a bigger piece to the turret to hold it better might solve this issue. The problem is for me is that the tank was ready when I ran into this, and it’s difficult to play around with it without breaking parts off. To be honest I was thinking about displaying the turret on a stand to show off the interior better, so I might side-step this issue; it would be a shame to glue it in place, as it would hide all the interior details.


Final small parts added… I try to leave these off until the very end- not to risk breaking them.dh7mu0f

The upgraded tow cables; I used the hooks of the plastic part, and replaced the plastic part of the wire with metal.kjjhisbblug4mwwrmqp4r

The cable is held by folding PE holders; it does not need to be glued in place.chvpggmf8oc8stgvsm4yj

The extra track links are also held by PE parts; the installation went on without a problem.gilkuzi1

And here is the tank -all done with the building. Still prone to lose it’s head easily -something I’ll have to figure out how to fix-, but ready for weathering. Next step: Windex chipping3xmpnhx

MiniArt T-44 build review p3. The lower hull


Once I did the gray primer base, and assembled everything to the level I thought was necessary to start the painting process, I used several light coats of white enamel paint on the interior parts. (The tank was painted white in the inside, as most AFVs are.) The key is to use several light coats, as white is a notoriously difficult color to work with. Once the paint was cured, the bottom of the hull was painted in a grey-blue color, which I mixed up using Tamiya paints, and sprayed onto the white base coat. (I used a youtube video of the interior as a reference, as the instructions would have you paint the sides completely grey. It is possible that both versions are correct, but I went with the video.)


lrqtatqen8gsgv

I should have left the engine stand out, as it would have been perfect to put the engine on for display…

paxggco


The finishing of the rest of the interior is a very straightforward process. All the pieces can be built, painted and weathered separately, yet I would suggest assembling the lower hull as soon as possible, and once it’s finished, only then proceed with the rest of the details. I decided not to add too much rust and streaks to the interior, as most tanks I’ve seen on photos and in real life were relatively clean in the inside. I did add some dirt, and some rust, but I tried not to go overboard. (I worked on the floor plates a lot more though. I did apply some serious wear-and-tear to them, as to the horizontal surfaces of the bottom of the turret.) I got Lifecolor’s liquid pigments on Ebay to try them out; so far they have not been a complete success… If you apply them onto completely matte surface, they’re fine. Anyhow, some of the rust spots have been made using these liquid pigments.


z7o9yxw

Well, there were some fit issues here. Most of it is easy to deal with if you are patient, and go section by section. I started from the back, and went forward, clamping and gluing the hull in sections. There were some minor gaps remaining (see photos). These were easily filled, and would not really be visible anyhow once the running gear was in place. Nevertheless it was not a “shake the box and done” affair; this is why I suggested to start with this step before you assemble and paint the interior.

ktqmkvv

zp0xq7dso3zcro

qdhtrfq

Driver’s hatch. The transparent part looks like an angry Tiki God from this angle.

lagk6hs

I built a somewhat accurate (but not very accurate) driver’s station using an AM set for the T-55 by CKM (some parts I adopted, some –like the pre-painted instrument panel- I left alone). It’s not accurate, but at least there is something there. (The basic outline of the T-44 and T-55 driver’s station are similar enough, though.)75bgp2eh7wwmfw

The instrument panel has a completely different shape; I decided to put it in nevertheless. (This is the first ever pre-painted instrument panel I’ve used, and I did not feel like trying to fabricate one myself.)2xvtzjpn1wlbysc9riabv

The grousers for the tracks are mounted on the back on a special rack. The straight poles that are holding the grousers however are very difficult to clean. The parts are tiny and thin, and the sprue attachment points make it really difficult to make them smooth enough so that they fit into the holes cut into the grousers. First of all, it’s worth slightly enlarging these holes. (photos 60-61) Second, it’s very easy to snap these thin parts when you try to clean them up, so it’s better just to cut them off completely, and use styrene rods. (see photo 64) I apologize for the quality of the photos; it took those with my phone instead of my camera, and the white balance was somewhat off; you can see it on some other photos as well. Lesson learned: DSLR only from now on.


jlpahug

There’s also a slight mistake on the last set: only three pairs of grousers need to be put into one holder; I went overboard and did four… (I guess I was happy that I found a simpler way than to try to clean up some fragile piece of styrene, and just kept going.) It would have been very nice if MiniArt had shown how to apply the grousers to the tracks; I’ve very rarely seen these in use on models.

bip15ev

MiniArt T-44 build review p2. The Turret


The gun is a really nice, multiple part assembly, and the plastic gun barrel is perfect (it’s easy to find a metal replacement should you want to, but it’s not necessary). One word of caution: once you install the gunner’s seat, you will be in constant danger of snapping it off… You will find the same problem with the top of the turret: once you add the little PE peg on the commander’s cupola that indicates the front of the tank, you cannot put the turret down upside-down, either… (Talking about the commander’s cupola: make a note where the notch for the PE peg is; it’s easy to glue the cupola on in a different orientation.) All the hatches are workable if you are careful with the glue.


cmcuxoo8um3uakk0oxn75

I used steel from the same paint range for the breech of the gun, and it did adhere better than to the ammunition (coming up in a minute); the difference was the base coat  I think– the gun was painted with Tamiya matte acrylics first. amfr2iayhhekc99vtmicr

Since there is an interior provided, there is the task of painting the ammunition… MiniArt provides a lot of extra pieces, so make sure you don’t do extra work, unless you really enjoy painting ammo casings and shells. The instructions give an extensive guide to paint them; there are several colors needed to be used on the shells themselves. I was a bit lazy and only painted the pieces of ammunition which would be visible completely; the rest of the shells received only the green overcoat, and the copper color for the casings. (They would be covered by the fully painted ones once installed into the racks.)

I’ve tried AK Interactive’s metallic wax colors to paint the shell casing, but it took ages to dry. When I tried to polish it, the paint simply rubbed off even a week after application. Perhaps a completely matte base paint would help the paint stick to the surface better next time; the finish is not as smooth as I hoped it would be.(I will need to figure out how to use these paints properly. Normally I use Citadell’s gold/shining gold/copper colors to paint shell casings.)

It’s safe to say that the preparation and painting of the ammunition took almost as long as the assembly of the rest of the interior; having a good podcast to listen to is very useful in this situation.

ngrpgut7uhsbohywy7gpe

The turret is a very nice piece of affair. Good fit, great detail both interior and exterior. The casting texture is great, and the parts are made in a way that the fit will be hidden (in most cases) by the welding joints. The only exception is where the two sides of the turret meet on the back; with some careful filling of the gap resulting, you can avoid damaging the casting detail. I simply used white spirit to wipe off the excess, hence did not have to sand it down. Only two ejector pin marks needed to be filled in the interior; the rest were hidden by the gun. The turret grab handles are very delicate, and unfortunately they broke on sprues as I tried to remove them. It was easier just to replace them with wire. It’s worth waiting with this step to the very last stage, so that I don’t break them off while working on other parts.

The turret roof is scale thickness- and the hatches are movable if you are careful with the glue.dmkjr2q

x2owbbljuxedov

The co-axial machine gunopyglovq7kqrcy


Well, that’s it. Soon: part three of the review

Miniart’s SU-76(r)

b9imxxe

This model has been a shelf-queen for a long time. When I moved to the UK I was living in a ~very~ temporary student housing, so I became severely limited in what tools I could use; among other things I was forced to give up on my airbrush. (It took me five years before my living conditions changed so I was able to get another one.)
This, and the lack of space meant I had to switch to 1/72 scale… a decision which I did not regret ever since. I quite like this scale, and I think I’ll stay focused on it in the future. However, there are models which make me stray from this scale into the world of 1/35. This one, particularly, sold itself with the box art. I liked the re-painted flaking dunkelgelb camo, and the relaxing German crew -even though I ended up not using the figures for the build. (I don’t like figures on models to be honest.) Originally it was a much more ambitious project; I wanted to make a partial interior, since the driver had nothing to sit on.
I bought the kit in 2011 in Norwich, and started work on it immediately; I thought I’d progress as far as I can without an airbrush, and then just put it away until I can finish it.

Well, I stopped a bit earlier than that.

The kit is not bad, let me say this. It is, however, not a very good one, either. There are some peculiar issues with it. For one, the parts are only numbered on the instruction sheet; the numbers are not on the sprues. This forces you to constantly check for parts on the instructions showing the sprue layout, which is really, really annoying.
The other problem was the wheels. The swing arms do not “lock” in place, where they are supposed to be when the tank is on a level surface. It’s nice if you want to position the tank on uneven ground on a diorama, however it makes positioning them on a level surface difficult. The vehicle cannot sit too low or too high; knowing what the proper height is is not easy. I’ve ended up building a rig to position the wheels using an armorama topic dedicated to this issue.
And there were the fit issues. Some parts were oversized -these had to be sanded thinner. The sides of the fighting compartment had fit issues, too, so they are slightly bent- a necessity when I needed to make sure it is glued on properly.

Nevertheless, the detail is excellent; if you accept the shortcomings mentioned, the kit builds up into quite a nice representation of the vehicle.

So… without further ado, the build.

When I got the model out of its box after sitting there for years, the first thing I did was to cut the swing arms with the wheels off, and built a little rig to help me reattach them appropriately. (As you can see I painted parts in a very funky shade of green back in the days… the reason was simple: I used up a batch of paint that was mixed for a Braille scale model. Fear not: it was not intended as the actual color of the vehicle.)

mcmzjco

The gun was almost finished when I got the kit out of the box, so there was very little work left to finish it. I did a silly thing, and added the muzzle break before putting the gun into its sleeve. This meant I had to cut the gun in half, attach it to the sleeve, and then glue it together again. No biggie, but a beginner mistake.

g0bsa64

The lifting hooks had a good amount of flash around them; it was simpler just to use a piece of wire instead. (I did clean one or two, before giving up.)

wyrxl6e

The build was quite straightforward after I took care of the wheels. Once they were on, I painted the sides of the hull with green, and did the whole mud and dust routine. After that I added the tracks, and then proceeded with the rest of the build. (Once the mudguards are on, the tracks are near impossible to add.) This section had to be masked, of course, for the rest of the build, although a little overspray of Dunkelgelb and brown actually adds to the weathering effect.

qiz6rpn

cinshdo


wg8day0

mfrzrxk

I’ve left the sides green, figuring that the Germans would not bother cleaning and painting the areas under the mudguards. You’d have to take the tracks and wheels off, and scrub it clean before doing any sort of painting -and the results would not be visible, anyhow. This meant that the mud and dust was going on over Russian green color. The tracks were assembled without any problems; the individual links were excellent. I painted the rims black (to represent rubber), but did not worry particularly about neat lines; the wheels were about to receive quite a heavy layer of washes, mud and dust. (Yes, I was lazy.) The surface of the return rollers that rubs against the tracks was painted steel.

u8zvqzd

j10znv8

The finished gun, and the sides of the fighting compartment.

xvi0zsr

I’ve decided to leave the fighting compartment in the original green color. (I reasoned that the vehicle was adopted to German use in a field shop, so they did not strip everything to be repainted. They would probably be content on leaving the interior of the fighting compartment untouched.) This made the painting a bit more tedious (had to finish and mask the fighting compartment before proceeding). The fighting compartment itself was painted along with the rest of the model in green, and the dust/accumulated dirt added using pigments.

pcrqyll

The painting of the ammunition was a bit boring to be honest. First, you have to remove the mould seams, and then paint them one by one… not very entertaining if you ask me. I’ve used Citadel’s bronze and gold colors on the casings. I cut a couple of the projectiles off to create “used” casings, which went onto the floor of the fighting compartment, under the gun.


Attaching everything to the hull… the parts of the model are in various stages of painting.

ljhj7nt

tfiac6d

rdvbkwq

The gun installed… I’ve used the kit’s tow cable, which was a straight plastic part; you are supposed to bend it around the holding pins. Well, I decided to be bold, and try it, instead of using a metal tow cable. (You also get the ends of the cable as two extra separate pieces should you decide to go this route.) As expected, the plastic broke; hence the somewhat angular look.

2r7vcqp

z0lvvnq

5zawtjv

hbzlj21

Once the sub-assemblies were reasonably done, I’ve used Russian green as primer.

I wanted to depict flacking paint as I mentioned already. Since the vehicle was captured, I decided I would not only show the underlying original colors, but the rust/scratches that the vehicle has accumulated before its capture. Once the SU-76 was painted green, I’ve used dark, rust colors on edges, and other areas where heavy wear and tear was expected. The idea was that removing the Dunkelgelb from these areas would expose the base metal, while on other areas only green would show through.

rtgirwl

4v7fy1q

oohqzwl

e2vuwsy

byvh3i71

tbsp7fy

boof70i

As soon as the green dried, I applied hairspray, waited an hour, and added the Dunkelgelb coat. (Tamiya paint, lightened with tan to account for the scale effect.)

hinn9ah

Yes, you can see the numbers still…

do19t7y

Since Tamiya paints dry really fast, I could add the red-brown pattern right after the yellow base. It was necessary to add heavy layers at regions where the permanent marker showed through… I thought I was smart when I wrote the part numbers onto the plastic with a permanent marker, until the point where I realized that it showed through on everything… Some of these numbers only disappeared after the brown color was added in heavy layers. There you go: an important lesson. Don’t use permanent marker on exposed areas.

By the way, this was the first ever free-hand camo I’ve done with an airbrush.

6plexsx

pwb9eil

are3pvz

qypjstu

The chipping was done with a brush, and with a toothpick- depending on what effect I wanted to achieve. I added water to the surface with a brush, waited a bit, and then used a stiff brush/toothpick to carefully. It’s difficult not to overdo it, so it’s worth stopping now and then for a while, and put away the model for a day or so. With a fresh eye it’s easier to gauge the effect.

Once I was satisfied with how the model looked like, I sealed everything with an acrylic varnish, and applied the decals. I took some of the decals from the MiniArt T-44 set; after all, they looked good, and I liked the name on the gun.

As soon as the decals dried, I applied another layer of varnish, and started on filters. I used yellow and dark yellow colors. While the surface was still wet with the diluent, I used some dark pin washes (the wet surface ensures that the capillary action can work unimpeded even on a semi-matte surface). The same filters and washes were used in the fighting compartment as well.

Everything was sealed with varnish once again, and I started on the dust and mud. The dust was simple light colored pigments (chalk ground up) added mixed in water. Once it dried, I just brushed away the excess, and sealed it with pigment fixer.

9jgnjj7

pnkuvch

xcjax9f

bjobkij

242gcad

actnnea

yow7dil

dddkljy

qhhjpij

duxfnox

qqhlhfv

s5vl3ja

The rolled up canvas cover was a very underwhelming affair; it did not look like cloth at all. (I was not even sure what it was until I checked in the instructions; it was very symmetrical and smooth.) The cloth effect was added using oil paints. I painted the plastic with desert tan first, and then used burned umber directly from the tube to add the folded cloth look using a brush, and rubbing some off after letting it dry for a day. I’ve even painted the sides with oils to give an impression of it being rolled up. I have to say the canvas given for the T-44 is a much better affair.

j4ujz3h

psn2mdo

nzsoqiv


ycsclnk


All in all, it was a pretty good result considering how this model looked like when I got around to finally finish it. The model itself is not bad, but I think the new Tamiya offering probably supersedes it in quality. Nevertheless, fear not; it was not an unpleasant journey.

Miniart D7 Armored Dozer -review 4. Final touches

So we have left off at the stage where the MiniArt dozer was almost ready. Some parts were still unpainted, but we are at the last leg of our journey.

spmjocn

After receiving another olive drab coat, it was time for preparing it for rust.

The engine has received several washes with dark brown and black again; and the underside of the chassis, alongside with the suspension and the dozer blade got painted with different rust colors randomly after the olive drab base. (From dark –almost black- brown to bright orange.)

gpfxu9u

u4yv7wo

hj78eeq

d8prbor

The model was covered with hairspray, and then a second (somewhat lighter) olive drab was applied to it. (Before the final paint coat I’ve attached the suspension units to the chassis.) With a damp brush I could selectively remove the upper paint to expose some rust; I tried not to go overboard, except on the dozer blade itself. The effects were quite convincing. Due to the olive drab base, the contrast is not as big as I would prefer, but the overall effect is actually very nice.

regej5q

s6hatk8
As I said: build the tracks one tracklink at a time

vu4b9xw

i8av9ro

3xm0f3n
The finished paintjob… it looks too good to weather

Chipping commencing… the rust colors are pretty neat, and the contrast is low enough not to look unrealistic.

wla8ywh

zkaks4m
Some areas received more heavy chipping than others.

aqgf72xj5fphes

yb3n7ps
The dozer blade was seriously worked on; most of the covering paint was rubbed away

545ffaes71jmq2ncr90xz54i6eld


0uc0lvm
I think the results are quite convincing


jg9lghwmwamgmwzdklbbc

6z1cxsh
The oil tank and the lower part of the chassis was worked on heavily, too. (The walls of the oil tank being thinner and more exposed would mean they rust easier.)

k3rlbgyiui4j0l

mb8dtca
Some careful chipping on the armored radiator cover t as well

Chipping done -dirtying up.

First, the model received a protective semi-matte varnish to protect our previous work.


m6aj6y9

Then came the decals. As I mentioned in part 1, the decals are brilliant. They don’t have transparent borders, even the stars. The carrying film is tailored to the paint, so you won’t see silvering between the arms of the stars. This does complicate the application a bit, since the decal can tear easily. (Because the large star decals are not just one discs, the individual parts move very easily in relation to each other -and this means stress on the film.)

6leixea85cedh1mx00xlshola8ozhdf4avly4vyibb

After the decals were dry, another layer of varnish was applied to protect them.


eys0rj98amf3r5

I applied pin washes of dark browns and black. After it was dry, I used Mig’s washable dust in a diluted form as pin wash as well -to model the dust collecting in crevices and around rivets. The excess was removed with a damp cotton swab. (These special products are fine, but honestly, you can achieve the same effect with pigments suspended in water.) I also lightly airbrushed this mixture on the flat surfaces on the top of the vehicle: the bonnet and the top of the cab. (For airbrush application these washable products are actually great; the pigment is so fine in them, it won’t block your airbrush.) I’ve used a wet cotton swab to remove some of this dust. It made it look more uneven, more realistic. I’ve repeated it several times to build up some layers.

b4njfzg

The sides were streaked using oil paint and turpentine; further dusting/fading was done using light colored pigments. The oil stains were added using AK’s Oil Stain product; same with the fuel stains. (I got lazy, I admit. Recently I purchased a lot of weathering products out of curiosity; most of the time they are time-savers, but not offer significantly better quality than the good ole’ modeller’s tricks.)

mzvd93s

9w1cses
The top is dirty; I don’t think it’s regularly cleaned as not many people can see it.

b7hqmsmf1d1xgxu0qxsckxmywtf8dotbqqkp0h6ceu

sqbfilg
Different rust colored pigments helped with the exhaust pipe

osy94lz

fekinvz
Some dust has accumulated around all rivets

pidmaopfold4knwvdlecirzwd6o2

u67myzg
The worn look on the dozer blade was achieved using some metallic pigments (both gun metal and silver). This created a very convincing sheen.

lbo35u3


Conclusion

Although it seems to be a returning theme to complain about the seemingly unnecessary complexity of sub-assemblies, these are not really complaints. I have enjoyed the building of this model immensely, as it did prove to be a tremendous challenge. It felt like an accomplishment when it finally took shape at the very end of the build. It is definitely not for the beginner; it is difficult to build even for a more experienced modeller with somewhat limited skills like myself. It was a great experience to work on a model whose designers obviously pulled no punches when it came to accuracy and detail; you have the feeling that the people who produced it were working on it with passion. It was also the enjoyment of the challenge; rarely have a model challenged my skills this much. Having built it, I have to say it feels just like when you just have finished a Marathon. Was the pain worth it? Absolutely.

And the best advice for this model? Pace yourself. Do not rush it, and you will enjoy the build. It is very intimidating when you are at step 1, and realize you have seventy nine other steps (one of them requiring you to build two sets of tracks…) waiting for you. If you take one step at a time, you will have an incredible little model on your table. This is not a weekend project; you will burn yourself out if you treat it as such; as it is, it took me two month to finish it working almost exclusively on this model.

MiniArt seems to have decided to establish itself as a producer of very high quality and complex kits; I think they are going into the right direction.

Miniart D7 Armored Dozer -review 3. Painting

spmjocn


This is the third part of the review of the Miniart D7 Dozer.

Even though the cab will almost completely hide the operator’s station, I decided to weather it properly…

gwqh5vr

As you can see I’ve already removed the offending toolbox from the fender

wkaumus
This is the last time you have access to the whole engine, so weather away… washes, oil stains, metallic pigments -anything goes. Only the sides will be visible, but we know it’s there

txvzmp1

k070vfz
The metallic shine came from Tamiya’s weathering master -silver and gun metal

zoilmmkemwlh0rzlp73fc

qfiyv5h
…aaaand… it’s all gone.

6bf1ecj

xchb29f
…a lot of the engine is hidden now as well…
rt0tety
On the other hand it resembles a vehicle now
rfj0ohn
Final parts attached, and yes, that is a handcrank

rzgbyfu

The tracks received a black primer coat first, and then were painted in a dark grey color. The metallic sheen came from dark metallic pigments rubbed on them; the parts that are normally subjected to higher wear and tear, therefore are usually highly polished, received some silver pigments. Once they were mounted onto the suspension I added a heavy brown wash, and once it was dry I added some dust, using brown pigments suspended in water, and some more silver pigments.

xlmpip9rbfsyv4


jkn0huh3xbvzja

bdzesii
IT LOOKS LIKE A D7 NOW!!

ark2t34

qnvifaw
This was an incredible feeling -after month of work on the model without any visible improvement, suddenly I had a D7 Dozer on my desk

bstrxsm

Teaser: Miniart 1/35 T-44 Medium Tank

Well, it has landed on my desk for a review. I think I’ll do an in-box one, and a multi-part build review, just like with the MiniArt D7.

utex0xs

At first glance the model looks more “traditional” than the D7 dozer – nothing stands out as especially challenging (famous last words). The quality is excellent, and the parts -by and large- are not so thin they break when you just look at them. There will be some opportunity to add the wiring to the engine, though. And more importantly: IT HAS AN INTERIOR. Even the tracks look painless to assemble… I think MiniArt has become something of a market-leader in injection moulding. (I’m just finishing an old kit that I’ve left unfinished -the SU-76(r), and the difference in quality is incredible. Even though the SU-76 is a great kit -much better than a lot of models I could name-, but it has its drawbacks. The parts are not numbered on the sprues, the suspension is not well executed, and there are some fit issues. If the T-44 is anything like the D7, it will be miles ahead of MiniArt’s old kits… and on par with anything that is out there. Exciting times…)

Due to personal issues I cannot start this week, but I’ll start the build next week, and see how far we get in a month. This should be great.


Miniart D7 Armored Dozer -review 2.

This is part two of the MiniArt D7 review.

The suspension is a very complicated, very detailed assembly. Miniart has managed to even mould a set of springs… an actual plastic representation of springs, which look exactly like the real thing. They are very delicate, and easy to break (while you are trying to remove moulding seams), and also will be covered by the metal plates protecting the suspension, unfortunately. Nevertheless I have to say, it is an impressive feat of plastic moulding technology.


hg4nixw
One ready, one unassembled

6pljonmajlrpyj

svlpsb8
That plastic spring still makes me wonder how they did it.

The assembly here -considering none of it will remain visible- seems overly detailed. The wheels and return rollers are composed of mulitple parts (step 51, 57 for example); I’m sure these could have been designed to consist of no more than two parts each. Most of the suspension elements could have been simplified as well, as they will be hidden once assembled. The only reason they are designed to resemble the real thing is that you might wish to depict the suspension during maintenance (I’ve seen a photo with the covers removed) or with damage. I was tempted to do a “cutaway” view on one side, but did not dare to endanger the review sample.

Once the suspension and the tracks installed, the final hydraulics pipes will need to be glued on. The over-engineering can be seen here as well: the pipes (H8, 9, 10, 11) could have been moulded together with parts H12, 13, Db16 to simplify things.


qyagpyx

2ywiznw
Those little pegs on top of the suspension could have been simply moulded together with the hydraulics

The dozer blade and its attachment unit is the very last step of the build. The blade itself and the frame looks gorgeous; you can see the subtle welding lines; the instructions, however, don’t show the alternative positioning optinos. It goes together reasonably well, however you will need to do some filling on the blade itself. Part Db4 will snap if you put it on  peg on Db9 in step 79, due to the smaller diameter of the hole on it; enlarge the hole slightly with a scalpel first.

agger8v

The model is slowly taking shape… time to paint.

qktqebjomn7h4tkjrzta9xblndslah0m9dab1ct0ch

bkg7acr
How many parts do a dozer make?

Painting

Fortunately most of the model is olive drab, engine included. This simplifies the painting process, as the model needs to be painted while being built. I’ve chosen to display it with moderate amount of weathering and rusting; while I really find the rusty-worn-torn look appealing, tanks and tractors did not really rust that bad on the field. (It’s a combination of short lifetime, maintenance, and protective paint.) Dozers and tractors are somewhat exception to the rule, as they were generally not in the line of fire, but I still did not want to overdo the effect. (After spending a month building it day and night I was afraid I mess it up with overzealous weathering. I’m a coward.) The other reason I’ve gone for the relatively clean look, despite of photos available of the dozer being absolutely caked with mud and dust was that this would have hidden most of the model.


sdlzfe1
Black spray paint was used as primer; any good quality spray can will do

opuewi6me7tqkz

26b0sxp
The plastic has some interesting moulding imperfections. Don’t worry; these will be invisible under the final paint.

slalkda

I’ve done most of the painting and weathering on the larger subassemblies: armored cab, engine and chassis, the suspension, tracks, and the dozer blade; this, of course means I only saw how the vehicle looks like at the very end of the building process. It was an incredible feeling -suddenly I had something to show for after all the work.

I’ve used Citadell’s Steel Legion Drab and Castellan Green to mix an olive drab color for the dozer. I always wanted to try the airbrush ready Citadell paints, and this looks as good time as any. Changing the ratio also allowed me to prepare lighter and darker colors. They are very thick, they did seem to be very good for airbrushing. I tried diluting them at first, because I could not see how this thick paint could get through the airbrush, they were perfect unthinned.


qigjqvhrbi7kpw6y12zhxsizixninqrjgvjzb2wjjvn44vifm


Well, the first paint layer was done. It’s getting near to the finish.