I mostly used acrylic paints and Vallejo weathering products because due to a small human cohabiting with us since the end of December, I need to limit the usage of stinky, dangerous stuff in the house. (I do make sure there is an appropriate separation, but one can never be too careful.)
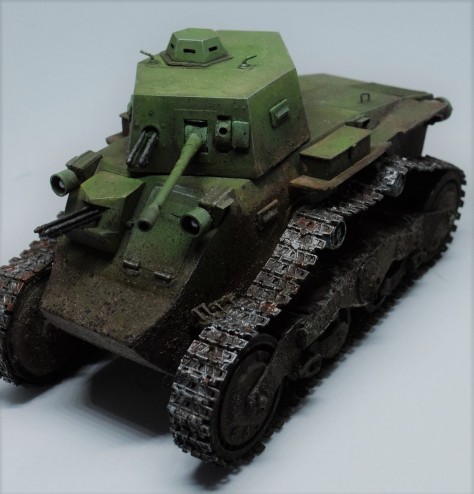
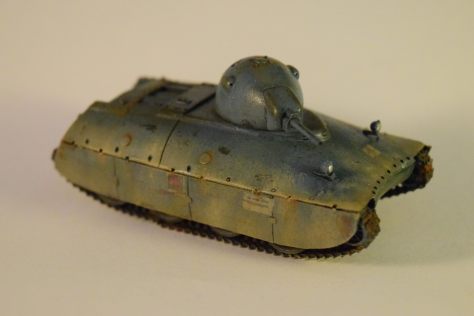
I wanted to depict a brand new prototype after a long day out on the proving ground -so lots of mud, but not much rust and fading.
I used Vallejo’s primer to prime the model, and a mixture of Tamiya greens to give the base color. (I don’t really know of any accurate color reference charts of pre-war Hungarian colors, so it’s a free-for-all.) I used Tamiya’s transparent green and yellow as a first round of filters (wanted to see how they work ever since I’ve read about them a while ago).
I also used several of AK’s filters on various parts of the hull to create hue differences. I used different oil colors as well for filters (dot method), and blending -you can see the results on the back hatches especially. All this helped to create visually interesting differences in the otherwise uniform green finish.
Instead of turpentine or white spirit I use Zest It as a diluent; it’s still not ideal, but better health-wise.
I bought a bunch of Vallejo’s weathering products: industrial thick mud, dust and oily mud washes, mud splashes, etc. They have the undisputed advantage of being water-based, so I can use them without worry to anyone’s health. I used the mud as a base, and stained it with pigments and paints, applying them in layers, and washing them back a bit with a wet brush to adjust the effect. (There are several mud colors, but I only bought one because I’m cheap.) A Tamiya mud weathering stick added some more hues of mud. (Just dab on, and adjust with a wet brush.) I used a silver pencil to bring out the details on the tracks, and to highlight the edges of the superstructure.
Overall this is a nice model. It is by no means perfect, but the result does look good, it’s not overly difficult to build (this is my first 1/35 resin model), and it is quite an unorthodox little vehicle which is relatively unknown and has an unique look. I really enjoyed the build, and since the tank has an intriguing history I am quite happy to put it on my shelf.
This is a very odd-looking tank from the interwar period, and it was the first (and only) original Hungarian tank design, the rest being either licence produced (or based on licences bought from other countries) or simply purchased.
History
The Straussler V-4 came as the further development of -surprise- the Straussler V-3 light tank. The V-3 reached to the prototype phase in 1936 when the decision was made to further improve it due to several shortcomings. V stood for “vontató”, that is “tractor” in English. (A specialised vehicle for towing, not for agricultural work.) The designer was Nicholas Straussler, a Hungarian entrepreneur, engineer and inventor living in Great Britain, who also developed the flotation system on the DD tanks, the Alvis Straussler bomb trolley, and the AC2, AC3 and M39 Csaba armored cars among many other things before, during and after World War 2.
The V-4 arrived at a very tormented period of Hungarian history, and a period of fast changes in tank design philosophy which explains its eventual failure.
After the First World War, Hungary was forbidden from most modern military technology, so any research and development had to be conducted in secrecy. The treaties also severely limited the options of the Armed Forces in acquiring military hardware or know-how. Nicholas Straussler was a Hungarian ex-pat living and working in the UK, who still had strong ties to his old country. He was an enterprising and prolific engineer who not only had his own firm producing his designs, he also sold them for several large UK companies. He designed and offered the V-3 light tank (which was a medium tank in Hungarian nomenclature) for the struggling Hungarian Armed Forces. The tank was to be produced by Weiss Manfred Steel and Metal Works, a Hungarian company. He envisioned the tank being built and exported to the UK and other interested countries which would have bought economic benefits to Hungary as well. This arrangement was mutually beneficial: it helped him cut the costs of producing the first tanks considerably compared to the costs of production in Great Britain. The development and production of V3 went under the name of “towing tractor” to circumvent the treaties’ limitation, and were produced without armor, armament and turret. They were to be equipped in the destination countries, which would have satisfied the letter of the peace treaties (somewhat).
The V-3, and its development the V-4, were planned to be small, amphibious light tanks utilising dual-drive, meaning they could be driven with and without the tracks on. This concept was all the rage back in the ‘30s, so we should not judge Straussler for jumping on the hype train. The V-3 utilised an unique suspension system developed by Straussler himself. This was further improved on the V-4 by adding return rollers which were used to adjust the track tension, as the original design was very prone to either break or throw a track.
The running gear had two powered large wheels on the front and back, and two smaller roller wheels per side These were connected by a three piece horizontal rocking arm (apologies; not sure if this is the technical term). The suspension was provided by two torsion springs per side, which did provide a very stable platform for the weapons at slow to medium speeds, but at high speeds they were stiff, resulting in an exhausting ride for the crew. The V-3 had no track tensioning. The tank had a detachable screw and two pontoons for amphibious operations. (Both the V-3 and V-4 have shown excellent aquatic capabilities: they could steer well, and were very stable and safe on water. The only problem it had was exiting the water if the terrain was not perfect for it, which is, let’s face it, not ideal for a tank.)
The V-3 was not a successful design; the multiple and conflicting specifications (ability to use wheel-only locomotion on roads, amphibious capabilities, 45km/h top speed on tracks, etc. etc.) ensured that the tank was suffering from reliability issues, and was not able to fulfill each and every specification. In road mode the tracks could not be mounted onto the vehicle, so they had to be transported by a different vehicle. The tracks themselves were too narrow, which decreased the ability to cross difficult terrain, and stressed the rubber rimmed roadwheels. At this point the tracks were simply moved by the friction between the rubber and the tracks, and no drive sprockets were present. The improvements on the V-4 transformed the tank into a much more reliable (and heavier) vehicle armed with two 34/37M 8mm twin machine guns and a 40mm 37M main gun. Since the Armed Forces had no other viable alternatives, initially they were very much interested in the tank, and were willing to look over its deficiencies. (Beggars can’t be choosers I guess.)
The Swedish Landswerk L-60 was also tried alongside the V-4, and the military imagined these two being used alongside each other. However the V-4 was still plagued by mechanical issues, it did not have a very good off-terrain capability, despite of the radical redesign of the hull, and the international situation changed sufficiently for the Hungarian Army to declare its intentions of rearmament openly, so they could pick and choose from a much wider range of options. These factors doomed the V-4’s chances of being accepted into service. The Hungarian Army considered several alternatives with the second production version of the V-4, and decided on purchasing the licence for the production of the L-60, which became the Toldi I after some further development. Straussler and Weiss Manfred did not give up; both the English and the Russians were interested in the type for a while. (The tank was also trialled in Italy in 1937.) There was an export version produced with a large radio aerial around the turret, and later Straussler designed several smaller tracked vehicles aimed for the Russian and British market with the suspension developed for the V-4’s.
Further reading:
An article about Straussler and a paper-panzer that has never been built:
The model arrived very well packaged; there was no damage at all after its two thousand kilometer journey to me.
I have to say the presentation of the model is exceptional. All the parts are bagged -sometimes individually, sometimes with a few others- , and the bags are labelled with the part numbers. This definitely makes assembly easier and more organised, compared to other resin kits I’ve built. Even the tracklinks from each side are bagged separately, which is necessary, given they are not identical. The V-4 had left and right handed tracks, so keep this is in mind when assembling. Having resin individual tracks is a bit bold since gluing them together is not as straightforward as with the plastic individual tracks. (With plastic you have at least half an hour, hour to adjust the tracks after gluing them together; you lose this option with CA glue.)
Some larger parts (boogies of the suspension, etc.) are still on their casting blocks, and the attachment points are very thick. Cutting them off will require some finesse and care. (Also, constant awareness of the health implications of working with resin. Resin dust is toxic, so work somewhere where others are not exposed to it, and wear a respirator. Alternatively use wet sawing, wet sanding techniques; the water makes sure the forming dust will not get airborne.)
The instructions are somewhat basic, and can be confusing when it comes to the running gear. Most of the assembly should go without a hitch, but the running gear is complex, and would need several drawings explaining exactly how it is supposed to come together. (The confusion comes mostly from the fact that the four powered wheels were powered by a shaft system that transferred the power from the middle of the suspension where it was attached to the hull. There is an excellent article of the history of the tank -unfortunately in Hungarian (http://www.hadmernok.hu/182_05_nemeth.pdf)-, but the drawings should help positioning the drive shafts.
The casting is very high quality, and flash is minimal; there is no complaint there. The hull, however, was warped a bit (see below). The fine, subtle details are really nice. The kit comes with some PE, which is also quite delicate and well detailed.
Assembly
Hull
I started the building with assembling the hull first, and this is where I ran into the biggest issue with the kit: the lower hull (which is provided as a “tub”) is somewhat warped – it was not symmetrical. (See photo.) Perhaps it would have been a better choice to provide it as several flat pieces, as most models go about it. I used the engine deck to force the back of the hull into the right shape -with generous application of superglue and patience I managed to make the lower hull conform to the rectangular shape of the engine deck. It is not perfect, but at least now it is almost symmetrical. The top of the hull has four parts: the smaller, rectangular engine deck piece, the large part covering most of the top, the sloping frontal plate with the driver’s hatch, and a small, rectangular part covering the nose.
Starting from the back I simply glued one piece after another, making sure they are fitted to the lower hull perfectly, hence slowly ironing out the asymmetry. This obviously does put some stress on the resin, so be careful. Since the hull is relatively thin, very small amount of force is required to hold the pieces together until the glue set; nevertheless make sure you do not break the tub if you run into the same problem and use the same method of correcting it. (Other option would be to warm the tub up with hot water or a hairdryer, and shape it while it’s hot, but I went about the safer way.) I hasten to add that it might have been only my sample, and other models are perfectly fine. Since this is the only sample I have I can’t extrapolate from this.
Apart from the issue of asymmetry, the lower hull and the sloping frontal part had some gaps as well; the fit was not perfect. I decided to use Green Stuff to fill the gaps, filling and reinforcing the attachment points in one go. Another fit issue was that the two top panels did not meet completely head-on: there was a slight step between the two, instead of a smooth transition. Since the large panel had hatch details moulded on I could not sand it to profile; I simply used putty and liquid green stuff to build up a slope on the back panel instead. Again; not something I prefer doing, but this was the best I could come up with.
I find it important to mention that these issues are not unheard of with resin kits; this is the price you pay for unique and rare models.
I glued in the armored protection for the vision port on the front, and the round bases for the return rollers. The armored hatch on the front houses the hull machine gun, too, and can be displayed folded-up. The problem is that only the barrels of the machine guns are provided, and there are no interior details. If someone is able, scratch building would solve this issue. As for me I glued it shut.
The great thing about the hull and turret is that the places were the vision slits, and other larger pieces would go are actually marked with a slightly different texture. This is seemingly a small thing, but it makes placing these parts so much simpler. I really did appreciate this effort on behalf of the designers of the model.
While the green stuff was curing in the seams of the hull, I finished the turret.
Turret
The next step was the assembly of the turret top. The commander’s hatch, unfortunately, does not fit in perfectly; it’s slightly larger than the hole it covers. You may leave it open (but the turret lacks internal details), or you can start carefully shaving off the extra, while continuously fitting it into its place to make sure you do not overdo the surgery. As I said, this is your standard protocol with resin models; they do make you work. (There is a sitting Hungarian tanker figure from Bodi, which might be used to cover up the empty space should you decide to leave the hatch open.)
The guns are supposed to be installed into the turret using a system that would make them movable. The main gun is held by two rectangular pieces with a plastic rod between them. The gun sight has a similar system, while the twin machine gun is installed using an even flimsier system of a half-sphere representing the ball-mount, and an L shaped part holding the half-sphere against the opening of the turret. The L shaped part can only hold the half-sphere in place if it is actually pushing it against the opening, which is not something you can actually achieve with simply gluing it in place. (The machine gun in the hull is not movable.)
The problem is that neither of these systems really work well. First, it’s quite difficult holding several parts in place while gluing; and you do have to hold everything in place in order to position the guns correctly. Second, the holding parts are a bit undersized. If you care about movable guns, you can just replace them using larger plastic squares; as far as I was concerned, I just glued the guns into place. The third issue is that before you do any of this, you really should check if there is clearance enough for the guns on the bottom of the turret. I managed to glue everything in place the first time around only to find out that the main gun was in the way of the bottom of the turret, so I had to adjust it again.
The assembly of the machine guns is a bit tricky. You have a central PE T-shaped part which supposed to provide the “backbone” for the twinned guns; the barrels are supposed to be running on both sides parallel, and the short hand of the T is supposed to be folded up to act as a holder. The problem is the distance of the gun barrels from each other… you can’t really set it correctly. Unless you glue them into place first, making sure they are parallel, and then add the PE part, you run the real risk of making them a bit wobbly. I used a thick, gel-like CA glue which gave me plenty of time to adjust things before setting, and did just that. This saved me from measuring and trying to position the barrels parallel to a precise distance from each other. The downside is that from now on extremely fragile things are hanging over the turret and the tank’s body making handling a bit more difficult. The detail on the barrels of the machineguns is somewhat soft.
I installed the main gun at this stage. The barrel is nice and straight. The muzzle break is a separate piece, and you have to be very careful gluing it into place, since it should be placed to the longitudinal axis of the barrel. It will show if it is off center even a tiny bit.
I finished the turret by adding the two armored vision slits on the sides.
Back to the hull…
The seams went through a series of sanding/filling until I was happy that no seam was left. I checked them after I applied the primer as well, and corrected the little imperfections.
Suspension
The model overall is very simple- except for one part. The suspension and the running gear are quite complex, and take up most of the model. The wheels and larger parts are on huge pouring blocks, which need to be sawed off carefully.
The suspension is workable, so you can put the tank into any sort of terrain. It also means you will have to carefully position the large and small road wheels before gluing to make sure they line up correctly should you want to display the model on a flat terrain.
The main bogie of the suspension unit is made out of three flat pieces; gluing them together was not very simple, and you also are advised to check if the top parts are right in the middle; otherwise the overhang will interfere with the smaller arms holding the large road wheels.
As mentioned the instructions are not very clear on how to install the drive system into the suspension, but the drawings in the linked article should help you. On of the problem is that while the suspension is movable, the drive train is not- so you will have to glue everything in place, making sure that the wheels will touch the ground once the whole unit is installed on the hull. I did the best I could, but honestly I am not sure this is the way to do it. In any case most will be invisible, so you might as well skip it. With all the complexity, it is a very impressive (although quite unnecessary) design feature of the model.
To mount the suspension units in place, I drilled a hole where the units meet the hull, and inserted a thick wire in it. A corresponding hole was drilled in the central unit, and glued in place using two-part epoxy. I reinforced the attachment point with wire because did not want to risk the joint giving up over time. To make sure everything is fixed in place until the glue set, I also used CA glue.
Once the suspension was in place, I started adding the tracks. As the tracks are not workable, you will have to glue the suspension in place. If you wish to display the model on a flat surface this can be done at the earlier step; if you wish to display it in a diorama setting, now is the time to decide how the suspension should be positioned. (The tank’s suspension can be set into pretty funky positions, so it might be worth considering a diorama.)
The tracks come already detached, which is nice. However… Every tracklink had to be trimmed of 4 connecting stubs that used to attach them to the pouring blocks. This was time consuming. (Even though I mostly build tanks I have a confession to make: I hate building tracks.) The tracklinks, in theory, may be workable as they click together -but you do need to force them, risking breakage. Since the traction is not strong enough for them to hold, some glue will have to be applied once you built a section. It is impressive nevertheless; but I did find that longer sections tend to fall apart from their own weight without glue.
The problem with individual tracks made of resin is that you don’t have as much working time after you applied the glue as you have with plastic tracks. I built up several smaller straight sections, and tried to get the overall shape from these. Once I was happy with their position, I applied the extra thin CA glue, and hoped they would hold. At the return rollers, where the tracks were bent at a steeper angle it was difficult to make them conform to the shape of the roller without coming apart. The problem with the moving suspension was that it was difficult to hold everything stable, so I ended up gluing the suspension arms in place before adding the tracks.
One last advice: plan the installation of the tracks so that they meet on the bottom of the drive wheels, and not in the air before or after the return rollers. Don’t ask me how I came at this conclusion. Once I am done with the painting I will glue the tank onto a base, and it will flatten out the tracks; right now the suspension is pulling them up a bit.
The mudguards and the rest of the missing pieces were only added once I finished the tracks, and the tank was firmly sitting on them. The mudguards should be fit over an angular part of the hull, but the folding line on the PE will not conform to the hull-shape exactly… I ended up gluing tiny evergreen rods where the mudguards were supposed to go, and used them as support. Where the mudguard did not meet the hull (in the angular part, where two hull plates meet) I simply unfolded a little of the flap that I had to fold into the photoetch previously.
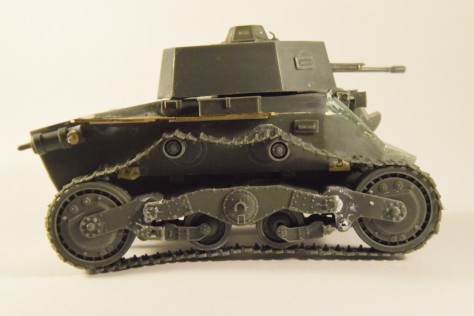
With this the tank was finished. It will take me a while to get it painted, but the painting stage should not be very difficult. If you have some leftover decals from other Hungarian tanks, you can built a what-if vehicle, which was accepted into service, but since it only reached prototype phase it carried no marks in real life. It can also be built very clean or very dirty, since it did go through trials; in other words the opportunities for weathering are endless.
There were several vendors in tents selling replica weapons, army surplus and scale models. There were several food vendors, too (selling for surprisingly reasonable prices), and a lot of heat-stricken people wandering about. Since it was Friday, the program was only a “dress rehersal” for the main events of Saturday and Sunday; regardless, seeing (and hearing) these tanks was pretty impressive.
I never thought the clicking of the tracks would be louder than the engine’s roar… these things are loud.
It was also very interesting to see how small the IS-3 was compared to the other heavies; however what it lacked it size, it made up for it with smoke… the engine was belching white diesel exhaust like nobody’s business.
As I said it was really hot. If I recall correctly, the Centurion actually had to wait in the arena a bit so it cooled down before it could go back to its parking spot.
I probably should have taken a couple of videos, too, but I wanted to enjoy the show. When you are taking photos, you already focusing on something else; I did not want to compound the issue with switching between photos and video, too. Probably should have given the camera to my ever patient wife, but she was actually enjoying this part of the festival.
There were people dressed in historical uniforms, actual tankers, and tank restorers mixed with us, mere mortals.
Later in the afternoon there was a demonstration of infantry-tank tactics in WWII. An M4 was attacking a German position with a PnzIV defending, but since it was only a rehersal, the soldiers were just strolling next to the tank. This, and the lack of pyrotechnics made the show distinctly uninteresting…
Needless to say, we did not mind the short program. The interior of the museum was really inviting with the airconditioning on.
Well, this is one of the most interesting areas of the museum, and if my information is correct, it is normally closed for the public. Except on Tank Fest!
Lots of spare parts, lots of tanks and other vehicles in various states of direpair… things you can’t usually see: T14 Heavy Tank, Conway tank destroyer and many other vehicles I have only heard about.
The only problem was room: it was difficult to squeze through the tanks and take half-decent photos. The exhibit is also so very useful as a reference for scratches, faded paint, paint chips, oil stains, dust and rust.
Wargaming set up a World of Tanks event here: you were allowed to play thirty minutes on a press account, and you got a code for a Churchill III, a T-shirt, and a backpack. (Not very sturdy ones, but still.)
I managed to try the FV4005 (presently grinding for it), and the Defender -to see how OP it is. In my hand it was not very… Unfortunaltely I had no time to try the rare, or never released tanks also in the garage of the account.
A cool exhibition of a Centurion cut in half, along with a somewhat corny video of a tank maneuvering and shooting on the range.
A cutaway T-55… this is something I’m definitely going to do. I mean I did try to do one before, but I always held back of fear of ruining the model. Not any more… The new MiniArt T-55A Mod 1981, here I come. (I really like the idea of cutting away the side of the hull by the driver.) There are other examples, too, for inspiration.
Assorted thanks sitting around. Black Prince, Comet, Archer, Panzer IV, The Penis Tank, and the rest. A WoT wet dream.
An armored plate with some projectiles sticking out…
Ever since I’ve learned about it, I wanted to see a Tankfest. Back when I was still sitting in Florida it seemed very unlikely that I’d ever get to one; but even though I did live in the UK for more than 8 years somehow I still managed not to go even once. (To be fair, Bovington is not exactly public transport friendly, and I did not have a car for most of the time.)
This year, by accident, I actually got to see Tankfest. I guess I am Good Luck Brian now.
Since we were leaving the UK for a job on the Continent, we decided to spend a couple of days around Bournemouth. It is an incredibly nice place, especially when it is summer (and I do not mean the usual British summer. I mean the 30 degrees, baking hot summer), and I wanted to see the Museum on the side -who knows when I would be able to come back to visit, right? (My poor wife was very accommodating and did not object spending a day among these metal contraptions.)
I planned to get to Bovingdon on Tuesday but we decided the last minute to do the Tank Museum on Friday. I had some vague memories of Tankfest being around the end of June, but with the trans-Continental move and all I did not exactly pay attention. Friday morning comes the shock- Tankfest. And I do not have tickets…
The 40 minute drive to the Museum was a bit intense for my taste; I just wanted to see some tanks, and was worried that I would not be able to get in due to the event.
Well, I was in luck – even though both Saturday and Sunday was sold out, Friday was still available. It was not a “proper” day yet, more of a trial run for the big day. No famous youtubers, no wargaming events, and no pyrotechnics for the tank show.
The place was not very crowded, on the other hand, so you got to get close to the tanks, and could enjoy the show without other people pushing and getting in the way, which was definitely nice. I overheard someone who worked there remarking that it was so much better than the usual overcrowded events. I also saw the end of the day a big group of people shepherded around -and recognized Quickybaby in the crowd. I guess this was the Youtuber section being introduced to the Museum. The Chieftain was also there; I wanted to say hi to him, but a certain Youtuber cut in the queue, and stepped in front of me. (I was a queue of one.) Shame on you, mate. And you call yourself British. (No, it was not QB.)
I got some freebies from Wargaming for playing the game on site (a T shirt, a small backpack and a code for a Churchill tank), and I got to enjoy the tank show in the arena. To be honest the whole event was much smaller than I thought it would be. The tanks were really noisy; I never thought the tracks can be this loud.
I also got to crawl around the tanks in the museum. And this is where I saw something that was both hearbreaking and funny in equal measure. (I know I’m going to hell.)
A small kid was just standing by the cut-in-half Centurion, completely still. His face was set in the grimace of complete despair and abandonment, and the tears were just streaming on his face. Apparently he was left there by his family. A Tank Museum volunteer was talking to him, while calling others on the CB, so there were about ten people swarming around him, trying to console him, while he was just standing there, staring in the distance, still in shock, not reacting to anything, and only responding to questions in a very subdued, muted voice.
I may go to hell for finding this whole situation both sad and funny, but the father of this child will definitely be there waiting for me. SHAME ON YOU, MISTER. YOU ARE A BAD PARENT.
I mean I get it, I like tanks, too, but seriously? You forgot about your own kid?
Interesting photos of the Sd.Kfz 251: the armor looks really rough. I always assumed that it was smooth; after all, none of the photos I’ve seen suggested this level of roughness, not to mention the models have not featured it, either. (Cast/rolled armor texture is something that is shown in modern kits.) Its counterpart inside the museum featured smooth armor. This may -or may not- be a Czech-made vehicle, retrofitted to look like a German Sd.Kfz. 251. (Someone suggested it might be the leftover texture after the rust removal process.)
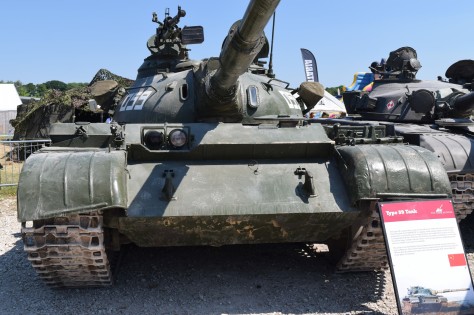
I really liked these abandoned, weathered tanks- the two big Cold War Warriors, the Centurion and the T-55. Good reference photos for extreme weathering.
Matilda I – you have to love it if for nothing else but for the eyes. Cool little tank.
Assortment of tanks standing around.
Churchill turrets shot up on the range… good reference for damage and rust.
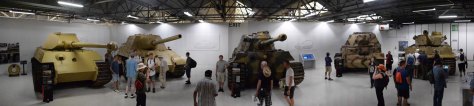
Cold War tanks in profile.
American heavy -M103.
Russian heavy- the IS-3. Astonishingly small… the same size as the Type 59 and the T-72 standing next to it. I also took a sneaky photo of the interior as seen from the driver’s hatch. The only interior photo I’ve ever seen of the IS-3.
This is one of those tanks that definitely has a lot of personality. From absolute obscurity it was launched into the general consciousness* by the online game World of Tanks, which features it as a tier IV light tank. It has a certain notoriety as it is certainly one of the worst tanks in the game, but despite of this it became somewhat of a legend (or a cult, rather) simply due to its quite unique looks. It’s a sort of hipster tank, just like the Churchill Gun Carrier. The WoT community has created several amusing memes around it, and it has its own nickname: “The Duck”. Right now the only mod I run with the game is the “rubber duck” custom paintjob. (See below)
*Well, more accurately, into the general consciousness of a certain gaming community…
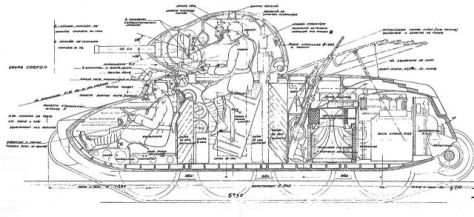
The unique look of the tank is the result of its designers taking the idea of sloped armour to its limits. The plans were drawn up in 1940 as a replacement option for the S35 and S40 cavalry tanks, but due to the German invasion these plans did not materialise; no prototypes were ever built. (To be fair it would have probably performed just as bad in real life against panzer IIIs and IVs as it does in-game.) The only contemporary image of this strange-looking tank available online is a drawing. The tank did inspire a lot of online creativity, thought…
I have been toying around with Blender trying to make a printable model of this tank, but so far my efforts are less than satisfactory. (I’m not giving up, though; if I succeed I will paint it in the Rubber Duck scheme.) Needless to say when I saw that OKB is producing a version of this vehicle I ordered one at once. I quite like this feedback of computer games into the scale model industry; a lot of newer releases (KV-4, AT2, etc.) were clearly inspired by the weirder prototypes, paper panzers popularized by WoT.
The kit comes in a typical OKB box, the parts placed into ziplock bags. The instructions are computer generated and quite simple, but this is a simple model after all. Once you finish the suspension/running gear (I have no idea if they are accurate), you’re essentially finished. It comes with two PE parts, and two transparent resin pieces for the headlights. It lacks the back-mounted machine gun that was planned (that up-pointing gun mounted behind the turret). Other than that it looks very similar to the blueprint, but distinctly different from its in-game representation. (Which is a shame, because the WoT turret with its secondary machine gun turret looks much better in my opinion. It’s absolutely fictional, but looks trump historical accuracy. Well, this is what Blender is for, I guess.)
The model went together without a hitch. The suspension arms fit well, the wheels went on nicely, and the tracks were a breeze to install; that was pretty much the extent of the build, really. Apart from this I had to glue the turret and the gun in place, install the headlights, and add the side-skirts. The building process took about an hour. The only tricky part was to fix the side-skirts onto the curved profile of the tank.
The painting was also pretty easy: I primed the model with the side-skirts off with Vallejo’s German Grey primer, and applied AK’s Chipping Fluid. Once dry, I mixed up the (fictional) blue-gray color from WoT using Tamiya paints, and misted it over the model in several layers. This was followed by some moderate chipping using a wet, stiff brush.
When the model was dry, I used some oil-paint based filters (light brown, blue) to modulate the base color somewhat, and sealed everything with gloss varnish.
Unfortunately there are no decals provided with the model.
After weeks of consideration I decided to test out printing waterslide decals using an inkjet printer. The results were not satisfactory (I used transparent decal paper instead of white, and the colors are very faint), but life is about learning, right? If you want to have faded markings, print decals -that’s my conclusion. The other -bigger problem- is the thickness of the decals; they are just not going onto the surface very well, you can see silvering despite of soaking the whole model in decal softeners, and in general, just being crappy decals. Conclusion? Buy an aftermarket set next time…
The headlights were painted using a chrome pen.
I added the decals, sealed them, and painted on some more scratches and chips. Using Tamiya’s makeup set I added some dust on the lower part of the chassis; and this concludes the painting and weathering phase; the Duck is ready.
Overall the model is nice: well designed, easy to assemble, and unique-looking. The price is moderately high, but affordable; it’s great as a weekend project (or for the true fans of Le’Duck).


