I quite like the Warhammer 40k universe and regularly paint the odd figure here and there. The cost of larger vehicles unfortunately is very high, especially the resin Forgeworld offerings; when it comes to decide between a small Imperial Knight or a 1/35 T-54 with full interior that is considerably cheaper, not surprisingly I go with the latter. (Let’s not even mention the $400–1200 battle titans.) It’s a shame, really, because there’s an awful lot of interesting stuff out there by both Games Workshop and Forgeworld.
There are alternatives, though. Mostly Ukrainian and Russian companies started to produce “alternatives” for the miniatures; they are cheaper, and more importantly, a lot of times much better than the originals. (I’ll paint a not-quite Abaddon and not-quite Mortarion figure soon, too.)


I’ve done a review of the set on ModellGeek some time ago; since then I have been working on and off on the painting of this model.
This particular conversion is for a (not quite) Death Guard Rhino, which is corrupted by the Lord of Decay- hence the pustules and blisters and cysts (not to mention the tentacles, horns, talons and other… things that stick out of this vehicle). The price is reasonably low, and it requires a Games Workshop Rhino or Chaos Rhino as a base vehicle. (I bought a built one on ebay quite cheap, and just cut it to pieces.)
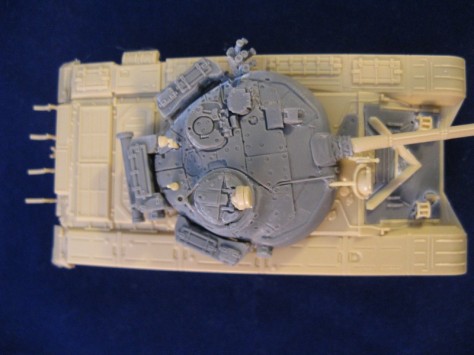
The model arrived in a very nice black box; quite professionally packed. It does not contain many parts, and the assembly is really straightforward. You essentially need to replace the side, the top and the front armor plates, and the folding door on the back. (You can buy tracks separately from the company if you feel like replacing the kit tracks as well.) The fit is relatively good, but filler will be necessary between the side and top panels; fortunately in this case you can be creative, and form additional horns, protrusions, etc. to mask off the seams. The right side- where the open hatch is with the skeleton inside- is quite deep, which necessitates some surgery on the interior side wall. You will need to cut the metal door with the frame out, so that the resin piece can fit into its place.
The victim


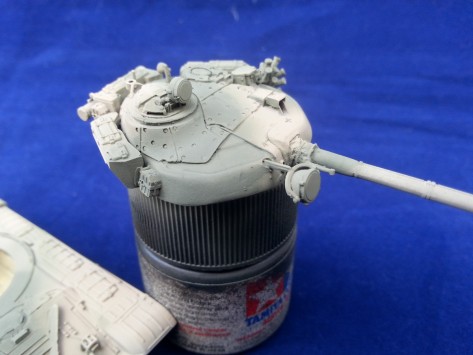
Some of the original kit is still visible, and the contrast between the old and the new parts is quite large. Perhaps texturing these regions with some putty would help; this is what I did on the lower front plate. There is so little of the original vehicle still visible, and the contrast is so large, I can’t help to think it would have been better just to make the whole vehicle out of resin, instead of creating a conversion.


The set does not provide a commander’s cupola; I used the plastic parts that comes with the Rhino. This is not an ideal solution; the cupola that came with my kit did not fit because of all the tentacles and whatnot on the top. It also looks quite out of place since it is not visibly corrupted like the rest of the model; you would expect every part of the Rhino to be uniformly touched by the Warp. I simply reused the hatches only, and made a couple of tentacles and cysts out of green stuff.
The folding door is also somewhat weird. In a vehicle like this you’d expect that most internal space is taken up by indescribable horrors spawned by the Warp -after all, a lot of it is sticking out from every opening. Yet the inside of the folding door s perfectly clean, not to mention the crew compartment, which is unchanged from the original vehicle. Interestingly the door has the exhaust pipes on them, which are apparently open into the crew compartment.
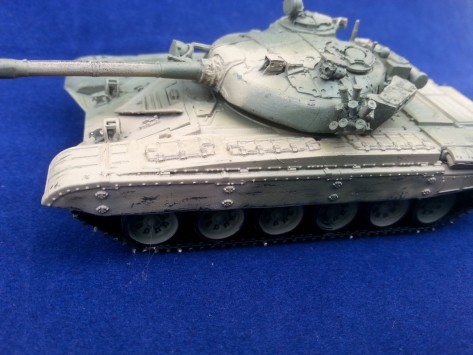
The assembly took about an hour. I have base-coated the whole tank with Tamiya Hull Red, and then went on creating as convincingly rusty hull as I could. Yes, I understand that it’s made out of adamantium, but when it comes to a fictional metal vs demonic corruption, I think the demonic corruption wins. The Rhino is rusted and that’s that.


The painting was a long process; mostly trial and error. As I’m mostly painting armor vehicles, I definitely need to learn the “miniature style” painting with high contrast and nice blending of colors. My WH40K models tend to be painted and weathered like a scale model of a real vehicle.
First step: the base color of the ATC. Obviously it needed to be rusted. I realized very long time ago that painting something with a color named “rust” will not give a realistic result; what you need is layers upon layers corresponding rust colors, making sure they are positioned where you would expect to see them. To begig with thick armor plats tend to have deep red/brown colors; thinner parts and the edges tend to have lighter rust colors, like orange or even yellow. So this is what I did.
And what colors did I use exactly? Well, what can be more realistic than actual rust? I ordered actual iron oxide pigments available in three colors -deep brown, red and yellow (Ochre), and using these I mixed up various shades of rust. I used a sponge to apply the mixture: dab the sponge into matte varnish, dab it into the pigment mixture, and into a cloth so that most of the pigment actually comes off, and then use this on the surface of the vehicle. It’s important you don’t add too much at a time, but build up the effect gradually. I used mostly the darker shades; yellow directly only was used on edges. As you can see it from the photos the contrast between the yellow and the rest is pretty high; this was taken care of later. This was deliberate; I wanted to have some contrast left after I finished the weathering, and subsequent steps had the effect of lessening the contrast. I used several brown and yellowish filters on the hull to blend the colors together, and then rubbed metallic pigments onto certain areas. (Focused on the edges mostly, but I rubbed pigments onto the “wounds” where the metal opened up as the horns were pushing out, and also on parts of large, flat areas.)


The tusks were pained with buff first, then ivory was blended towards the tips, making a nice, soft transition between the colors. The boils and whatnot were first painted with blood red, then using brighter and brighter red and orange colors mixed with lahmian medium I added somewhat translucent layers on top. At the very end I put a yellow dot off-center onto each, then a final layer of very translucent orange to blend the colors together. Once everything was finished I went over the boils with a clear, shiny varnish to make them look wet.
The bones were first painted by white (to make then stand out), then went over them using a yellowish white (well, bone-colored) paint. The effect was further helped using dark brown washes with diluted Citadel inks, which acted both as filters (modulating the bone color), and as washes (forming shadows on the surface).


The top of the vehicle looked like a gigantic wound, so I used bright reds and orange to make it look like raw flesh. The underlying areas were painted a deep, angry red, with brighter and brighter reds (later oranges) layered on the protruding areas. Since the organic matter seemed to sweep over the metal parts, it was painted in a more brownish red to provide some transition. I accentuated the effect using bright red inks; some of the overhanging tissue was only tinted with this mixture (applied in several coats).
I was not sure what the spikes were representing, so I kept them rusty.
There were tiny, oblong shapes all over the hull; I took them as mites or other parasites, and painted them bright green- to give some contrasting color to the model.


The tentacles were somewhat of a dilemma. After considering green and flesh colors, I decided on purple. The base was dark purple (tentacle purple by Citadel’s nomenclature; the actual inspiration for the paint scheme), which was highlighted using pink purple mixed with lahmian medium to blend it in easier, to make the color somewhat translucent. Some of the thicker tentacles had suckers on them, similar to an octopus’; these were painted carefully with bright pink. Once everything dried, I covered them with heavily diluted purple ink in several coats until they looked as if the brighter colors were underlying tissue showing through a translucent skin. The effect was surprisingly good considering I was improvising.
The triple-skull mark of Nurgle was painted first with a light, bright green, that represents heavily oxidized bronze, and I added some very dark metallic bronze colors on some areas somewhat randomly. (I tried to make sure mostly the parts that are jutting out would be painted; after all we’d expect these parts to be rubbed clear of the oxide.)
The holes on the exhaust on the top were painted with a very bright green, again, to provide some contrast. The exhausts on the back were blocked with some run-off. Since we’re talking about plague and Nurgle here I decided on a green paintscheme; I tried to emulate how other paint lava and other hot materials which seem to be emitting light on their own.


The goo was first painted with the lightest, brightest green I had, and darker and darker greens were blended onto this surface, making sure that the original bright green was still visible in the deep crevices, and that the color gradually darkens. The idea was that as the goo cooled, the colors darken; hence the large dark green surfaces. The rims and the interiors of the exhaust pipes were pained bright green to simulate the green light they reflect from the radioactive/infectious goo.
Well, pretty much that’s all. I really enjoyed the painting process although it took an awful lot of time. I’ll get a couple of Death Guard marines, I’ll paint up Mortarion, and I’ll have a little happy family of plague bearing Space Marines on my shelf in no time.