
You can find the previous parts of this review under the following links:
You can find the review I wrote of this MiniArt model on armorama, and another review of a simplified version of the same kit here.
In this post we’re taking a look at the interior- and hopefully finishing it. (Well, most of it.)


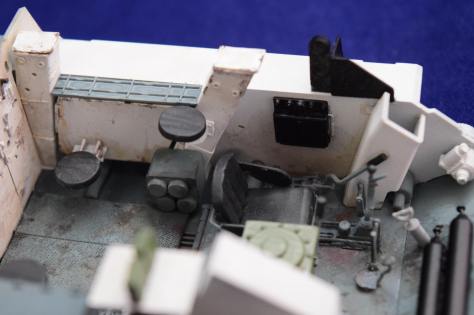
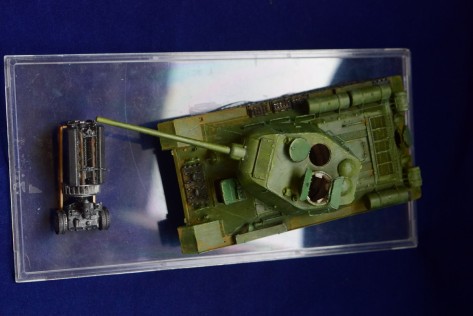
Most of the components are installed; the basics are done. I’ve put in the engine for the photos sake, but will display it outside of the vehicle. The gun is installed, and only a couple of small bits and the fuel tanks were missing at this point. The assembly went together without any issues; even the bits on the steering mechanism fit into the transmission without any problems. (In other words: they fit like a glove with is pretty good considering we’re talking about a multiple part assembly.)
I’ve also put in the finishing touches for the interior. By and large it went together fine; the fit is remarkable. Two issues I ran into: the back of the fighting compartment is one of them. The issue is simply the following: it is made out of three sections. Once is the large firewall between the engine compartment and the fighting compartment. The second is the edge of the top of the engine compartment (which, unfortunately, is not covered by either of the back sections), and the third is the back of the superstructure. I did not anticipate that the armor plating on the engine compartment will be visible, so I had to paint the edge white after I installed it. The best would be to fill in the visible seam, but unfortunately I could not figure out how to do it. (I’ve already painted and weathered the to larger parts.)


At this point the fuel tanks, the oil tanks, the compressed air bottles, the handle of the fuel priming pump (which was blue in the T-34 I saw, so I painted it blue instead of red), the ammunition, and all the other bits and pieces are installed. The one issue: the ammo on the racks. They would need to fit into corresponding holes on the top of the fighting compartment, so make sure you align them perfectly. (Not like I did.) What I suggest you do is to leave them out until you’re ready to attach the top of the fighting compartment. This way you can gently adjust them while the glue sets into their proper position. Since I’m not planning to glue the top on, it’s not really much of an issue.
I finished the final touches of weathering on the transmission and other interior parts. I blended in some gun metal darkened with black paint onto the transmission, and highlighted the edges with steel color. It received several dark washes; I have used a damp brush to adjust where the washes flowed. I used some oil stain AK products with some dark grey pigments to make it looked used and dirty. The metal bands on the two sides, which help with the steering got a light Citadel zinc overcoat to simulate oxidation and heat damage (as these parts overheat a lot, which encourages oxidation).
The fighting compartment only received a moderate amount of weathering as I wrote in the previous post, since these vehicles were not in use for the years to develop heavy rusting, and the crew kept them relatively clean.
The sides of the superstructure were fitted with all the details. For some reason the propellant cases are marked to be painted green instead of the brass color every other case has. The crew light was painted using a Citadel technical paint. I first painted the bottom of the part silver, and then used the Citadel paint to stain the face of the light fixture. Since the paint flows more like a wash, it left the protecting wire frame relatively free of paint. (The extra was scraped off with a blade.) The effect is pretty good in my opinion. (I just noticed that there are no photos of the walls; will rectify the situation in the next post.)


The first step was to add the frontal armor plate. It’s a bit fiddly, and it’s easy to break off the suspension’s springs while you’re trying to navigate it into its place. (To be honest these springs will not be visible even from under the vehicle, so if they break off, they break off. Only you will know they’re not there. Once the front is on, you can attach the top of the engine compartment. It’s a large piece of plastic which has most of the fenders as well, and you will need them in order to attach the side plates.
I would have liked to do a cutaway version of the engine compartment, but could not really figure out how to, so I just closed it in. The flaps over the cooling vents can be positioned; however they would be invisible in the finished vehicle, as the armored vents completely cover them. The two pieces that go over them (Ca13, Ca14) have apparently three alternative placement (about 2 mm from each other), but the instructions do not give any indication what these options are, and why you would want to position these parts differently to begin with. Strange.
I’ve finished detailing the sides and the back of the fighting compartment, and glued them to the model. I’ve added some wires to the light and the electrical switch box on the right hand side to make them look a bit busier. Interestingly the pistol ports are not operable, unlike in the T-44. They are simply molded on the plastic, but it would have been nice to have this option.
The fit of the sidewalls and the back armor plate is tight but good; I did not have to use putty, or trim anything.
At this point the model finally looks like a proper tank destroyer, with the interior mostly finished. The hatches allow only a limited view of the interior, so I think I’ll display the model with the top of the fighting compartment lifted up. I’ll use either stiff wires or plastic rods to hold it off-center above the model, as a “cop-out cutaway”. (I was a bit reluctant to start cutting and sawing. With the next model I’ll do a real one, I promise, with the sides and top cut out.)


And finally, work has started on the tracks. The tracks are not workable (regardless of what the instructions claim), but they are fine nevertheless. The pins are too small to hold them together with glue, so they actually do fall apart once you assembled four-five pieces on their own. Hence: gluing. Normally I’m using Tamiya’s lemon based Lemonene cement; the only problem I have with this product is that it looks just like the retarder they sell… and the first couple of pieces I tried to glue with the paint retarder. (Yes I was curious where the brush from the jar disappeared, but not really focused on the issue. No, I’m not a very smart man.)
Anyhow, the best method to glue individual links together is to work in sections: do doubles first, and then assemble those into larger and larger sections. You have at least a couple of hours to adjust the sag before the glue sets completely, so it gives you time enough to assemble half section, wait a bit, and fit it over the running gear. (Every side is usually made up by two halves- at least this is how I prefer to do it. It’s easy to mix up the different sections for the two sides if you work with smaller ones.)
Now, onto the colors. I’ve chosen black as a base color simply because most of the Russian tanks I saw had trans that were black. No doubt it is a museum-related thing and not historical. First of all, why would anyone paint the tracks? Any paint and rust would rub off very, very, very quickly indeed once the tank starts moving. I’ve made this choice, however, because I wanted to have a “distinctive” look for my Russian tanks, and not use the same track painting and weathering methods that I use with the German tanks. (In reality most tank tracks have a very dull, steel color -they are a steel-manganese alloy-, which is covered with dust and rust in the recesses. Most of the rust, mud and any other contamination simply rubs off as the tracks rub against each other, the running gear and the ground.) I go with these “artistic licences” as if I really, really wanted to be accurate, I’d be working with only 50 shades of brown mostly. A little color here and there (even if it’s black) livens things up a bit.
Once the tracks were assembled, I used an acrylic spray paint to paint it black. (Grammatically incorrect, however it had to be done for the reference’s sake.)
After drying the first thing to do was to add a neutral wash by Mig. (I’ve got it in a discounted set for painting primer red, and have no idea what to use it for. It looks nice as dust/mud deposit.) The next steps will be adding a good thick slurry of pigments/oil paints to simulate the slush of snow and mud, and I’ll rub a silver pencil along the surface to simulate the parts that were worn to the bare metal. The guide teeth will be treated in a similar manner, since the drive wheels rub them shiny as they turn the tracks. (Silver pencils are great for simulating worn-down metal.)


