It seems like we are living in a Golden Age of model building: more and more “mainstream” companies come out with models with full (or reasonably full) interiors. Back in the days we had the old Academy Tiger I, MiniArt came out with their excellent tanks with (almost) complete interiors, and now Meng, Takom and Rye Field Models (among others) issuing their excellent models with interiors from the FT-18 to the M1 Abrams. We even have 1/72 scale models with interiors included. I yet to have to finish an old build, a DML Panther ausf G with a resin Tank Workshop interior, but these kits really, really made me excited. (In the meantime Trumpeter announced a 1/16 Panther with interior… In case you don’t have enough choices already.)


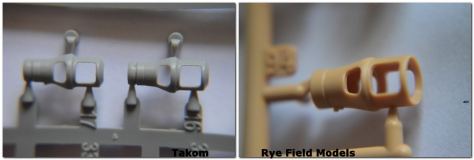
Two companies tackled the famous Panther with full interior: Takom and Rye Field Models both issued their versions in early 2018 making the choice between them particularly difficult. I purchased the Rye Field Model version immediately, and then I realized there is a competitor in the form of the Takom kit. Amazingly both models are quite reasonably priced for what they are (but still not cheap), so finally I ended up buying both. (Yes, I know, they are not the same: one is an Ausf A, the other is an Ausf G.) Let’s take a look at the differences between the two…
The aim of this review is not to evaluate the models with regards to accuracy; there are many other people who are more qualified to do so. I merely took a look at them as models, put them side-by-side, and tried to figure out how they compare with regards to ease of build, detail, instructions.
(Later on I will do a side-by-side build.)
Update: Takom build Part 1.
If you are interested in sprue shots and individual in-box reviews, both have been covered by other modellers; the Takom model was reviewed here,
and the Rye Field Model here.
In this review I’ll use [R] wherever I refer to the Rye Fields Panther, and a [T] wherever I refer to the Takom one. (Would have been interesting to put the Meng Panther next to these ones, but that would have really broken the bank.) I took photos of key areas: welding lines, cast and rolled armor surfaces, ammunition, track links, etc. I also scanned the instructions (apologies for the quality; my scanner is not the best), and created side-by-side images for easier comparison of certain sub-assemblies (and of course the quality of instructions themselves). Since a picture tells a thousand words I do not comment on all of them; I also kept the text reasonably short. I also took a look at photos of the Meng Panther kit online to see how it measures up to these two, but obviously I can’t really draw conclusions based on this.
I’ve uploaded all the photos on a google drive (with the instructions included) here.
Without further ado, the comparison:
Both kits come in huge boxes. The sprues are placed in resealable plastic bags in both kits; the packaging looks very similar. (I would not be surprised if both kits were produced in the same factories…) The plastic is really nice to the touch in both kits, although the colors are different. There is no flash in either case. The clear parts in the [R] kit are protected by an additional small box, but the turret was broken off the sprue regardless in my model.
[R] is an Ausf G, [T] is an Ausf A (duh). If you absolutely want an Ausf G, go with the [R], and vica versa – in this case the choice is clear, and you can stop reading this review. ([T] is coming out with an Ausf G version later on, though. They will also issue tanks with Zimmerit applied, and also a model with an optional clear hull; [R] is issuing a Panther with a cutaway option already included, which makes the build considerably less stressful than when you do the cutting… it seems like we are getting an endless permutation of options which does not help with choosing only one.)
The painting options are appropriate for the versions in question, although it is slightly annoying that no Panther kit available provides markings for the country that kept the Panther in service for the longest period of time: France.
None of the models has Zimmerit. If you build an Ausf G produced after 4th September, 1944, you should not add it; tanks produced before should have it. But then again, the clear hull makes it a bit pointless to cover it up. Most Ausf A versions had Zimmerit applied; Takom, if I’m not mistaken, is going to issue a Zimmerit decal for this tank, and you can also buy resin, PE and decal Zimmerits from other companies (or do your own).
[R] is moulded in light brown/tan, [T] is light grey plastic.
Overall impression: [R] seems like it’s massively more overengineered than the [T] kit: subassemblies are built using significantly more parts, even if they are not strictly necessary. (Example: engine cooling fan unit assembly: [T]: 3 parts/each side; [R]: 15 parts/side. Step 66 shows the assembly of the transmission final drive: all gears are provided, even though none of it will be seen once completed.) Although both are incredibly complex, the [T] kit seems like it’s significantly easier to build. Taking a look at online photos of the Meng kit, it looks like a more traditional kit, so that’s probably the easiest to build (apart from the tracks -more on that later). The Meng kit features prominent structural elements inside the hull, so if you want to use an aftermarket interior with the Meng kit you will have some difficulties. (But then again, if you want a tank with interior, it’s easier to get either the [T] or [R] kit.)
[R] instructions


[T] instructions


Instructions: both are clear; personally I like the [T] computer generated version better than the more traditional line-drawing of the [R] one. It is important to mention though that some drawings on the [T] instructions are way too small; you will need a magnifying glass to make sure you glue some pieces in the right orientation. [R] does have some issues with the instructions (more on that later). One of the most vexing issue is that no real painting/decaling guide is provided for the ammunition (but plenty of decals). [T] does provide a guide to that. [T] and [R] both provides the interior stenciling that tanks normally have, which is nice. (There are aftermarket sets available if you need more.) Overall the instructions are clearer with [T]. Neither gives a guide to the wiring of the radios or other electrical equipment, which is a shame. More importantly, neither takes in account the painting steps. Since there is a complex interior in both kits, the assembly sequences will need to be changed accordingly. It probably makes sense to first put together several sub-assemblies and paint them together, than do the painting at several stages.
[R]


[M]


Talking about decals: both are very fine; if you look at the macro shots, they are actually legible. (It was more difficult to photograph the [T] one as it was white against a light blue background. I tried to crank up the contrast as much as I could to show them off.


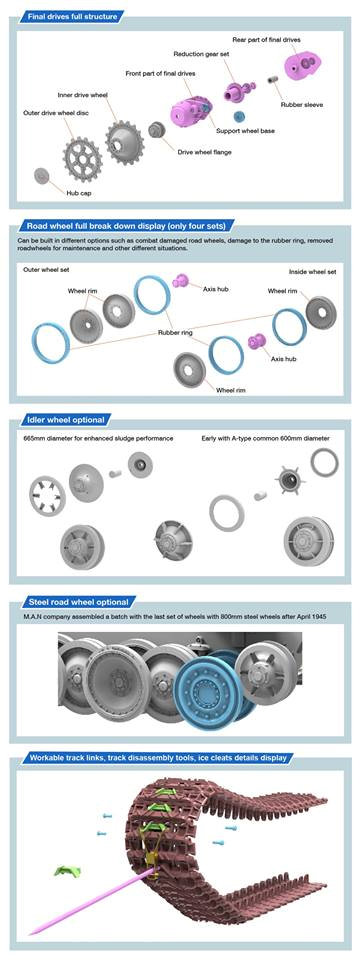
[R] The wheel assembly is a bit strange (this is an issue about the instructions). Steps C37, C41 each show the assembly of one roadwheel pair with rubber rims -actual rubber-, but then they are not shown anywhere else. (I’m not clear why we get rubber rims for two of these, but the rest is simply moulded on.) The alternative steel rimmed wheel option is first mentioned in p23; it shows up in the painting guide again, and at step 66 we are shown the assembly of these wheels (C36), but no information of what they are used for. We only see the rubber rimmed wheels installed at step 69. At step 70, 71 we see the steel rimmed wheel option already installed in the assembly sequence. The point is: the different options need to be decided upon before building and understood, as the instructions can be confusing. In case of the steel rimmed wheels I guess the painting guide could be used as a base: if you want to paint the tank in the given scheme, you install the wheels, and from then on, you disregard the other options. (Alternatively, if you do know your Panthers -or you are not concerned about absolute historical accuracy, after all it’s your model-, you can make your own decisions, obviously.)
The tank can be built with an optional engine heater, but it’s not actually shown where it is (or what it is); just how the firewall and the air intake should be built for that particular option. The [T] Panther can be built as a commander’s tank with the extra antenna, but no additional radio or other interior detail is provided.


Size: both are very similar; essentially all major dimensions are the same. The interior is basically the same -both models are quite accurate as far as I can determine. (I’ve built the DML Panther G with Tank Workshops interior about ten years ago, and have a lot of reference material; I am by no means an expert, though.)


[R] Transparent hull and turret parts (only in the limited run version, though) [T] no transparent parts (not even the periscopes), the interior will have to be displayed differently. (Cutaway, assembly line, maintenance… there ARE options.) [R] will be coming out with a non-transparent version with a special cutaway hull and turret.

Plastic detail: amazing on both. The “Continental” marking can be clearly read on the roadwheel of both; the bolt heads, and other small details are very sharp and well defined; overall the fine detail is just amazing in both models.


Casting texture: [R]: has nice casting texture on mantlet, and on the exhaust protectors; no texture on engine deck covers and on the hull/turret. Looking at photos (and seeing an actual Panther in Bovingdon) I have to say the engine deck covers do not really have a cast texture, but the ventillation openings do. The omission of rolled armor texture on the hull and turret is understandable: any texture would make the astonishingly clear parts, well, less astonishingly clear. However, if you plan to paint them over, you will miss the rolled armor texture. (But then you should buy the [T] kit, as one of the main advantage and selling point of the [R] kit is the clear hull and turret).
The [T] kit has very nice texture on the engine deck covers, the air intakes, etc; fine texture on the hull and turret. The texture seems a bit deeper than on the [R] kit. The texture in both kits is very discreet.


Weld seams and welding beads: [R] and [T] both have very nice detail in this regards – even on the clear parts. I have to mention the engine deck covers on the very nice welding lines on the air intakes on the [R] kit.
[R] Lots of slide moulding (muzzle break is single piece, MG’s hollowed out; [T] also uses advanced moulding technology, but it features a two-piece muzzle break which is less ideal.
PE: [R] has extensive PE provided; lots of sub-assemblies require PE, especially the lower part of the hull, where the ribbing is formed by PE parts. (It looks like a problematic part of the build.) [T] solves most of the detail issues with plastic (even the springs on the back of the seats are moulded on); only the crow’s feet antenna and the air intake covers are provided as PE.

Suspension: [R] has optional workable torsion bar suspension system, while [T] does not have workable suspension.
Running gear: [R] uses polycaps on the middle row of wheels (8 in total), making them removable for painting. I’m not really sure why they did not go with the polycaps for the rest; this solution does not seem to solve anything, really.


Tracks: [R] features workable tracks, and the horns are moulded in place thankfully. (They are hollow, too.) However there is a prominent ejector pin mark in the middle of each link. On the other hand [T] provides link and length tracks. They have no ejector pin marks, however the horns have to be glued on separately using a rig system allowing you to do it in sections instead of one by one. This system is not exactly an user-friendly one as some horns tend not to stick to the links, and will need to be re-glued separately. [R]’s individual working tracks, on the other hand were a breeze to assemble. (The Meng kit in this respect is the worst: all horns have to be glued on individually.)
Gun: Both guns are incredibly detailed, even where the mantlet covers them up. (It is useful if you want to show the models during maintenance.) [T] has some missing detail (guiding wire mesh from the R kit for example); [R]: gun is incredibly detailed, and the recoil can be made operational. I have to say gun recoil by a spring is not really an important feature, though in a scale model. The gun lock can be built engaged/disengaged on the roof of the turret in the [R] kit, but not in the [T] kit. The turret roof looks slightly different in the two kits (see photos); I’m not sure it’s the differences between the versions, or accuracy issues. On the [R] gun breach the tube for the compressed air bore evacuation system is missing. (Can be replicated with wire, but you really should not have to.)
[R]: mine thrower can be rotated, depicted open/closed, while the [T] has only one option (closed).
Turret basket floor: [T] features a one piece floor. [R] has two pieces, with an alternative option of having it in three if you cut the folding part in half as shown by the instructions.
Fume extractor: the hose of the fume extractor running from the spent case storage under the gun to the top of the turret is a flexible plastic piece in the [T] kit, and a two-piece plastic affair in the [R] model. Personally I like the flexible solution better.
[R]’s turret interior is way more detailed; you are shown how to install the electric cabling as well. (There is also a cylinder in the interior of the shell casing storage under the gun… one of those unseen details that seem to be absolutely unnecessary.)
Panel with drivers/radio operator’s hatch: this panel can be removed in both kit (Meng’s Panther does not have it as a separate part). This may be useful for showing off the interior, or depicting the tank undergoing maintenance. (This was the only opening big enough to remove the parts of the disassembled transmission and final drive if they needed some work…)


Ammo storage: on the floor units [R] kit uses full length ammunition; [T] provides only the protruding tips which make it a simpler assembly.
Ammo: neither has stamped bottom provided as PE disks. The base is moulded on, which is nice, but obviously the pattern on the bottom is missing. [R] provides little circular decals which I suspect are to be placed on the bottom of the ammunition to remedy this issue. (The projectile parts are different for each type, which is not shown in the instructions -see picture below.)
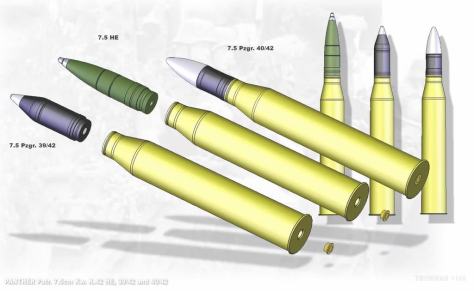
This picture shows the different kinds of ammunition the Panther carried, and a good painting guide. [T] provides a guide to paint the shell cases in the green-laquered steel color late-war shells were equipped with instead of the usual brass; it’s up to you if you want to equip your Panther with this sort of ammo. (Due to copper shortages the Germans were forced to switch to the less-than-ideal steel version late war; it does add a visual interest to the model.)


[R] has prominent ejector pin marks on the back of the engine firewall; if you plan not to install the engine they will be visible (unless you sand them off, of course).
The jack in the [R] model can be shown in storage and in-use configuration.
[R] Alternative option for back storage bin: there is a night vision option provided -but no further explanation is given. I assume if you buy an IR aftermarket set, you should install the alternative bin.
[R] Step 70: some sort of track maintenance option is shown but not explained. It would probably be a good diorama subject, though.
[R] two headlight options but no explanation
[R] has an option to install ice cleats
So what are the conclusions of this comparison? There are marginal, but important differences between the models. Both are very complex, state-of-the-art kits featuring an accurate depiction of the actual vehicle. The [T] model is more “user-friendly” both in instructions and the way it is assembled; having finished the interior, I can compare it to the newer MiniArt T-54/55 kits: complex, detailed, but not very taxing.
It lacks the clear hull and turret, which is a big selling point for the [R] Panther, but it has nicer textures. There are some shortcuts (the one-piece turret basket floor for example), some drawbacks (two-piece muzzle break), but overall the quality and complexity is very high. The [R] model is way more ambitious: it is way more complex, it uses a lot more PE, and it features the clear hull/turret parts which ultimately sold it for me. (A word of warning: the clear parts will be only included in the anniversary edition. One can only hope that the non-transparent version will have a textured surface.)
Both models will be a challenge to build, but the [T] kit has less of a skill-floor – it’s friendlier to the average Joe such as myself. The [R] kit will be appreciated more by people who like to go “all-out” with their build, and prefer to have as much detail as possible -and know their Panther in-and-out. They will be able to make the most of this kit, since there are several opportunities to display the tank in maintenance, assembly or as a wreck. They will find the assembly easier, too, since they will not be dumbfounded (and confused) by the huge number of options which are not clearly explained by the instructions. If you know your Panther intimately, you will be able to get the most out of the [R] model. The [T] is “just” an extremely impressive model with full interior, while the [R] one is a more special, one-of-a-kind kit. I did end up buying both, since they are both significant improvement over the resin interior I’ve built before, and both are worthy kits to build. Anyone willing to purchase one should weight the issues that matter to them most to decide which model is the right one for them: individual tracks vs link-and-length, workable suspension vs static, one-piece muzzle brake vs two-piece, clear hull/turret vs conventional one. I could not so I bought both. I hope this short comparison will help others to make their choice, though.

Excellent comparison review for those trying to decide which kit to get. I would get both myself as i’m very curious to see how they build up.
Thanks for the time you put into this article.
Dave.
LikeLike
Thank you 🙂 To be honest I’d love to do a side-by-side build. I suspect the Takom kit is easier to build, but the RF is more detailed. Question is- how much are you going to see of it once it’s done?
LikeLike